

So with summer in the works and a restless toddler on my hands, I recently took to Pinterest for some good ol’ fashioned inspiration! You see, last year I came across an event that was truly touching, Alex’s Lemonade Stand Foundation‘s National Lemonade Days – An annual event that raises money for all forms of childhood cancer through the act of selling lemonade. Unfortunately, I had come across the event about two weeks too late, but I vowed to remember it this time around. Sure enough, as spring sprung, I took to the pins to search out the perfect lemonade stand just in time for the 10th anniversary of ALSF, and we found it!

Compliments of Vanessa over at See Vanessa Craft, we were provided the perfect plans to construct a quick, affordable and sturdy little Lemonade Stand! After reviewing the plans that Vanessa provided, I decided to make a few small adjustments of my own. Nothing drastic but just a few differences to note.
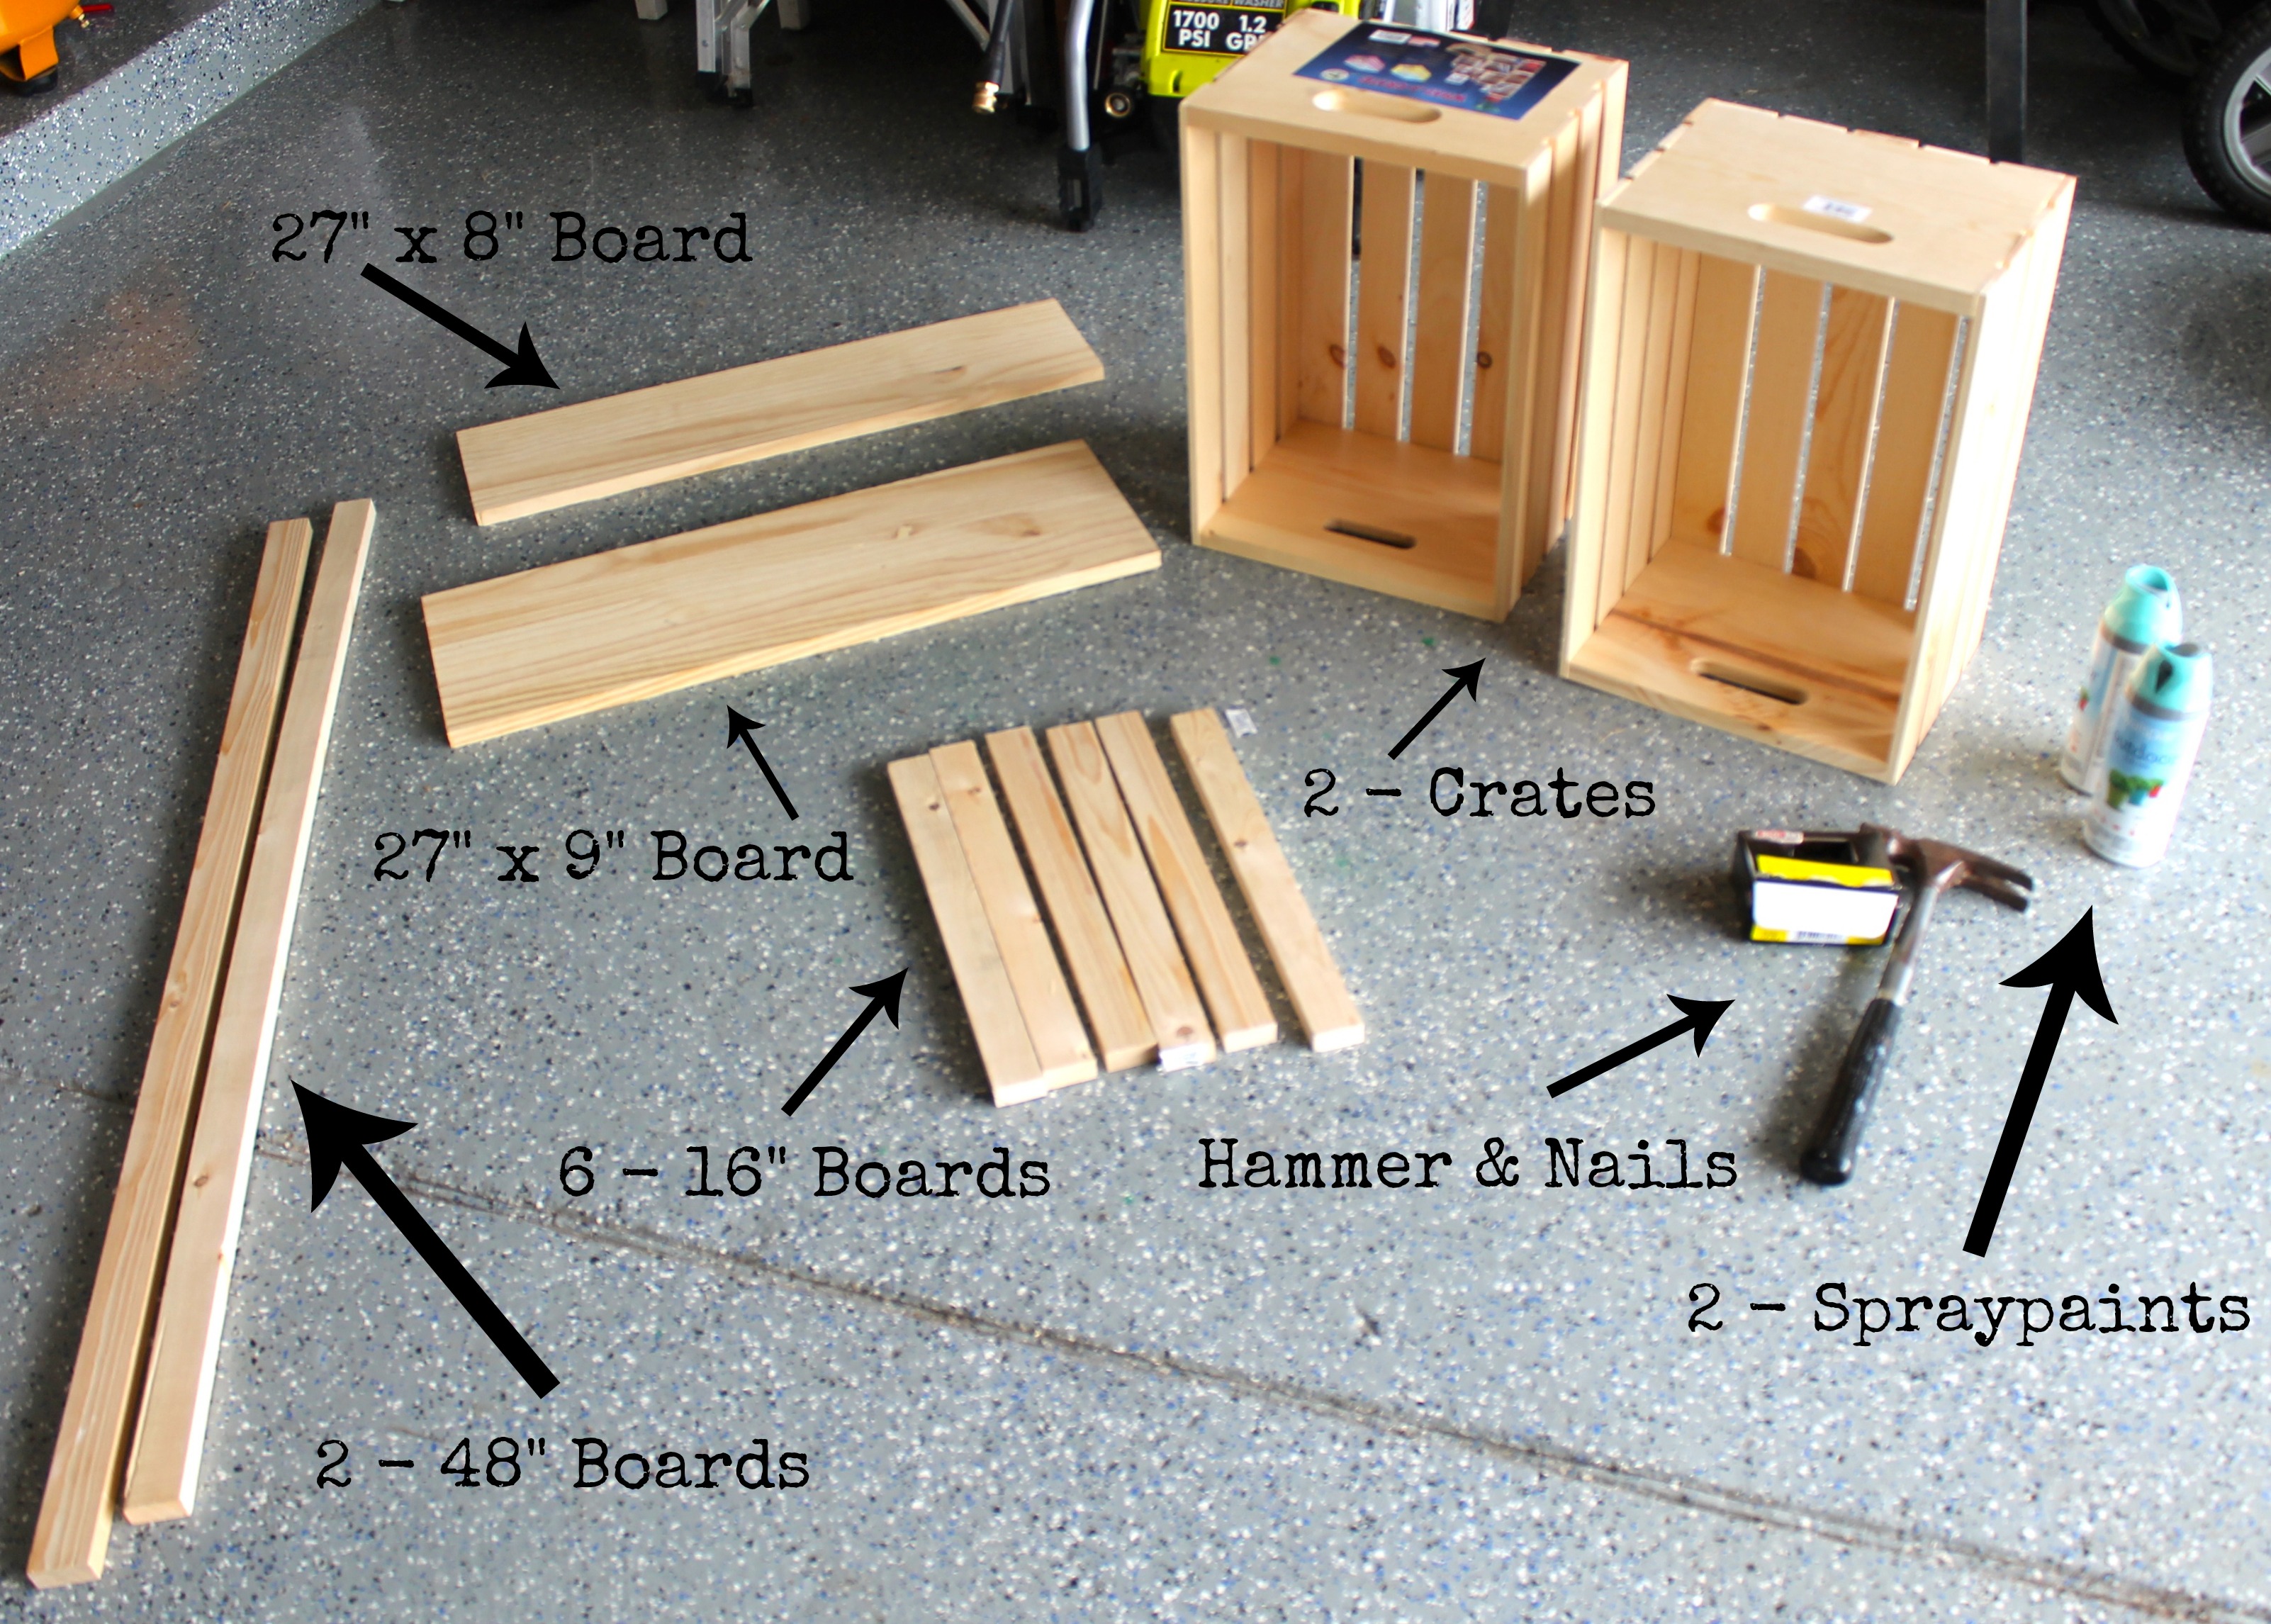
Below are the supplies and directions for the Lemonade Stand my daughter and I put together:

(2) Unfinished Wood Crates – Found At Michaels (12.5 x 18 x 9.75 Inches)
- $13.99 per crate – 2 x 50% off Coupons – $13.92
(2) 8 Foot Boards (1 1/2 x 3/4 Inches Thick) CUT TO:
(2) 48 inch Long Boards
(6) 16 inch Support Boards
- $2.98 per board- $5.96
(1) 16 x 36 Inch Pine Board (3/4 Inches Thick) CUT TO:
(1) 27 x 9 Inches
(1) 27 x 8 Inches
Left Over Wood: 16 x 9 Inches – Would Work Great For A Menu Sign!
- $6.90
– Nails & Hammer – A Nail Gun If You Have One (This Really Helped To Speed Up Our Process!)
- Free- Already Owned
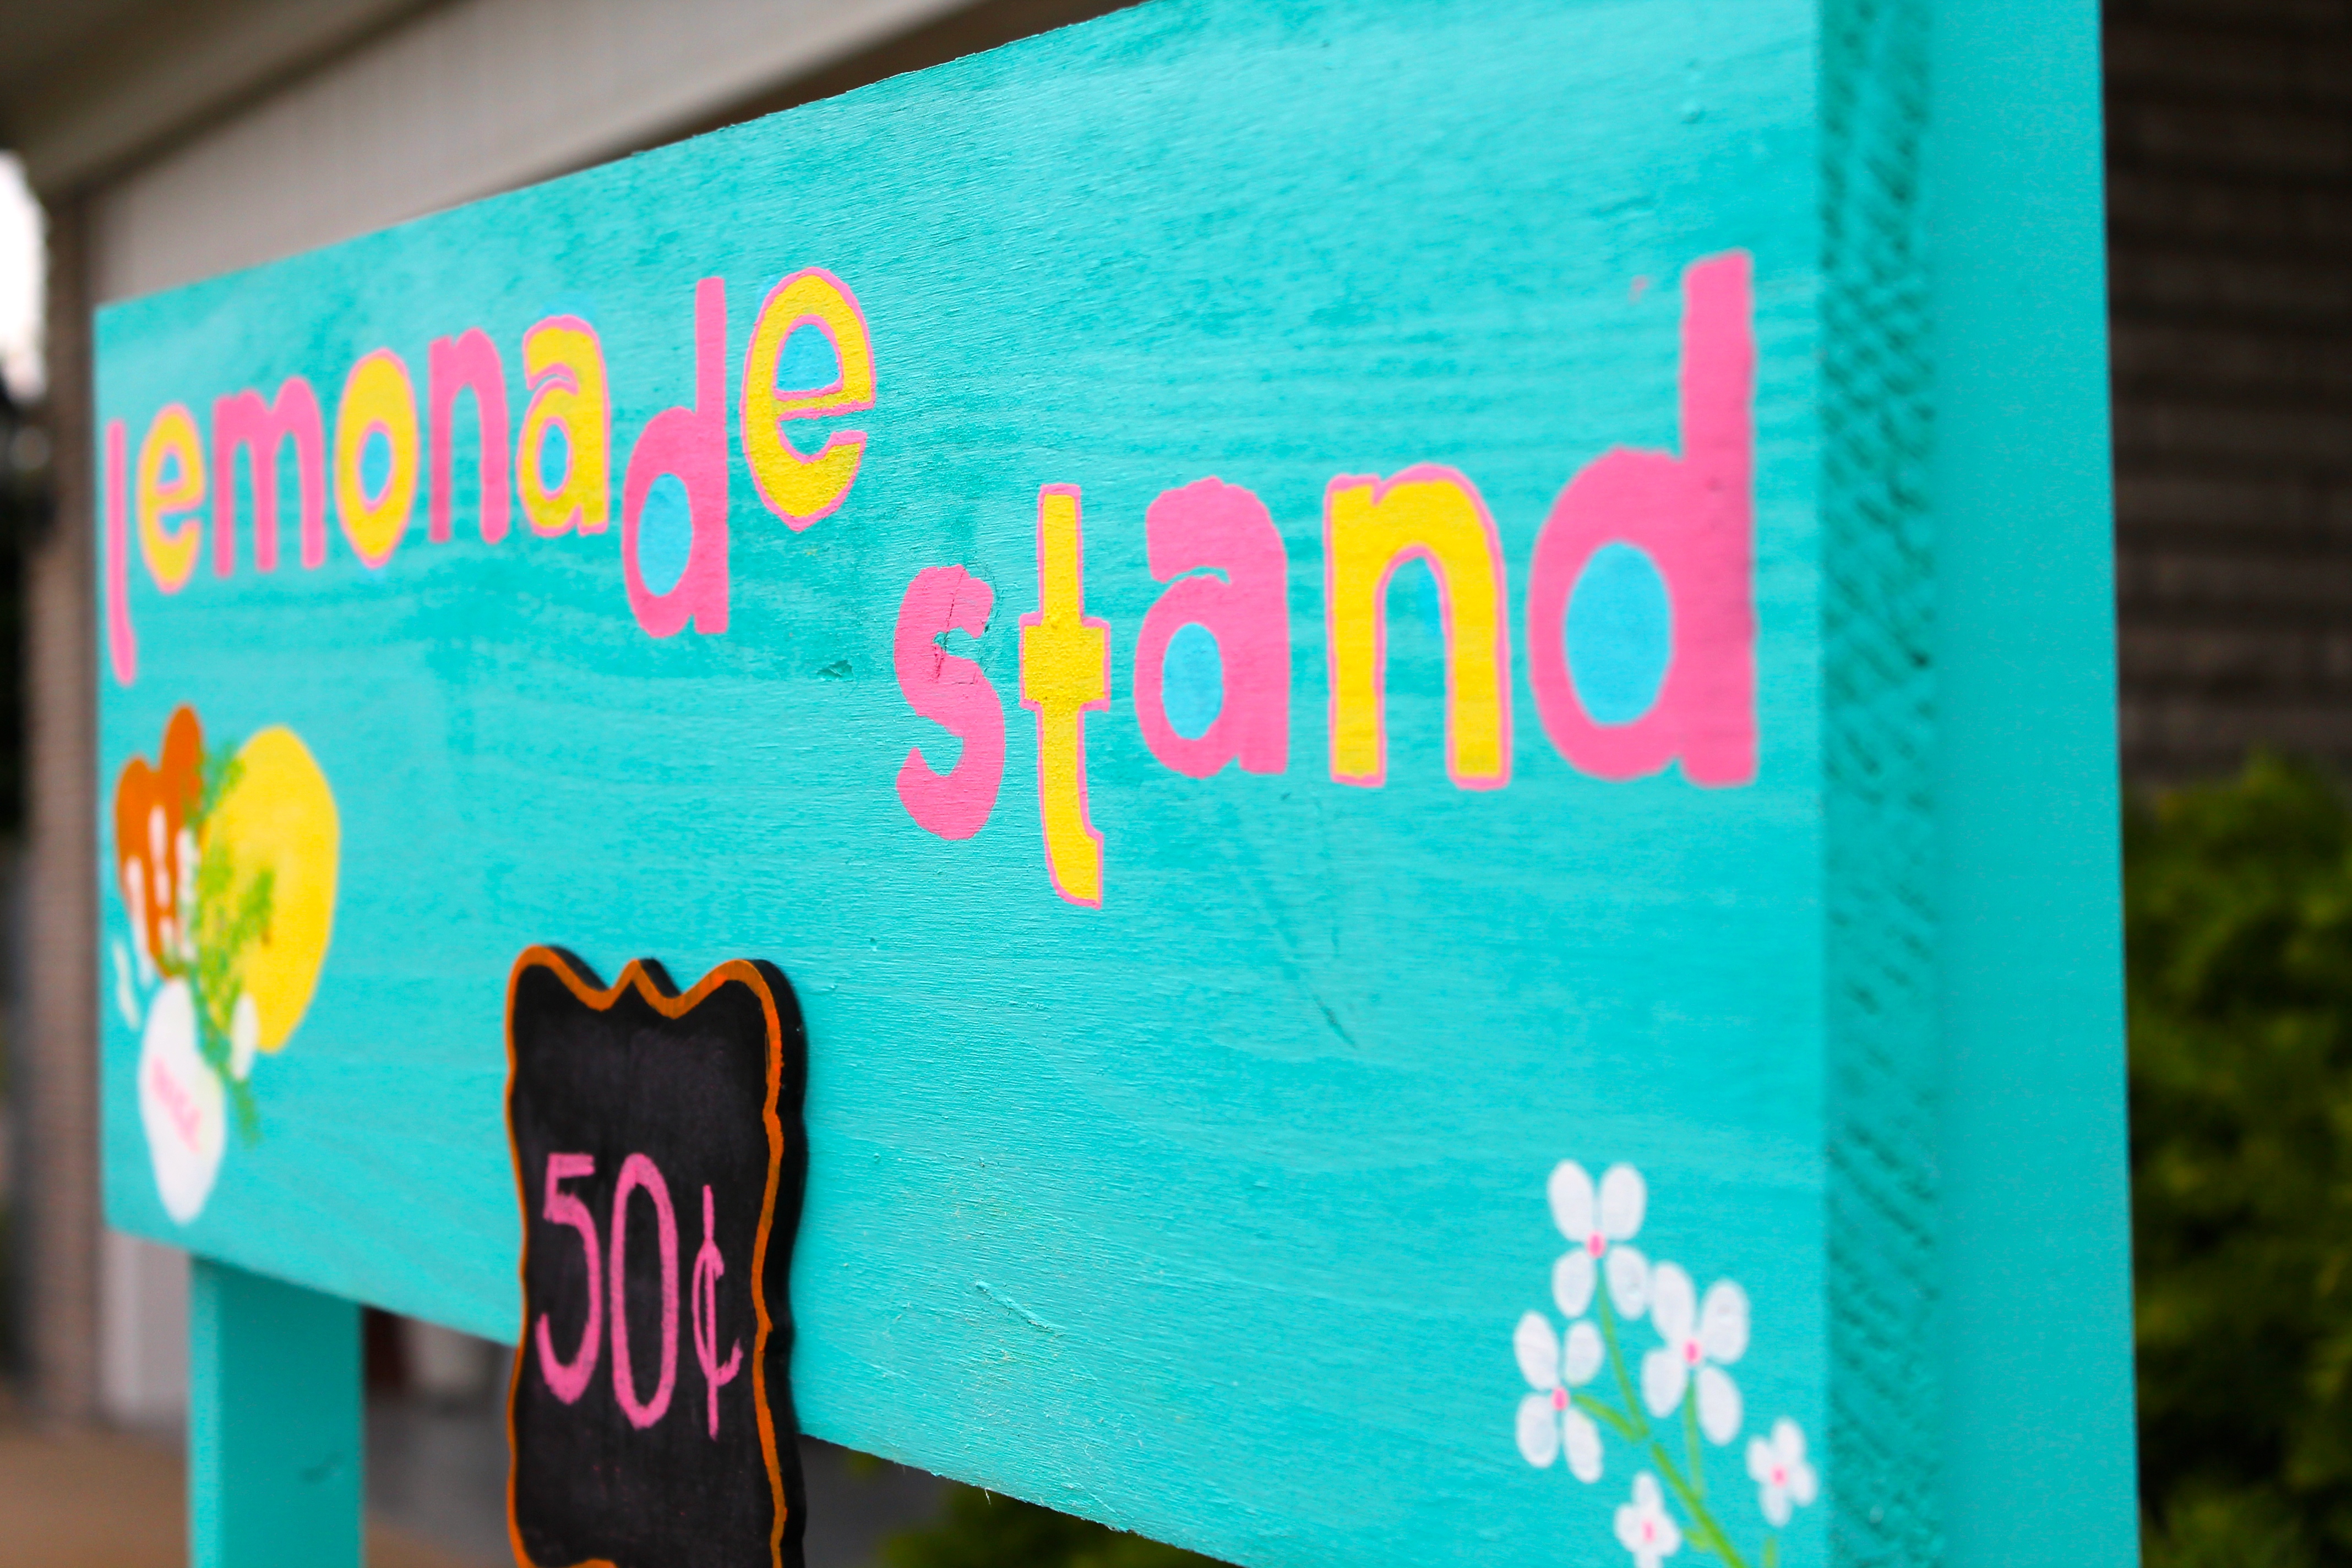
(2) Cans Of Valspar Outdoor Spray Paint – Color Optional – I used “Koi Pond”.
- $4.98 per can – $9.96
(1) 4×6 Inch Photo Frame (Of Your Choice)
- $1.00
(1) Lemonade Print – 4×6 Inches
- Free – Designed and Printed At Home. Print Also Available At: TwineWithATwist.Etsy.Com
Additional Paint, Paper Banner & Stencil Supplies:
- $2.00 – Miscellaneous Acrylic Paints / Stencil – FREE – Created With Cricut / Paper – FREE.
TOTAL: $39.74
With a budget you can work with, this stand is easy on the wallet. To believe the compliments I received on such a frugal project! I was incredibly thankful for Vanessa’s plans. Now, on to the directions!

Step 1: Buy your materials and if possible (I Highly Recommend This), have one of the employees at your local hardware store cut the wood for you to size! I’m personally no good with our table saw and I’m pretty sure that’s not the best option for this project anyhow, I opted for the “please help me” look and it worked. You can too!
Step 2: Lay out all your supplies to get organized. This works best for me so that I don’t go losing things. It’s also helpful when your toddler is feeling in a helpful mood. . .


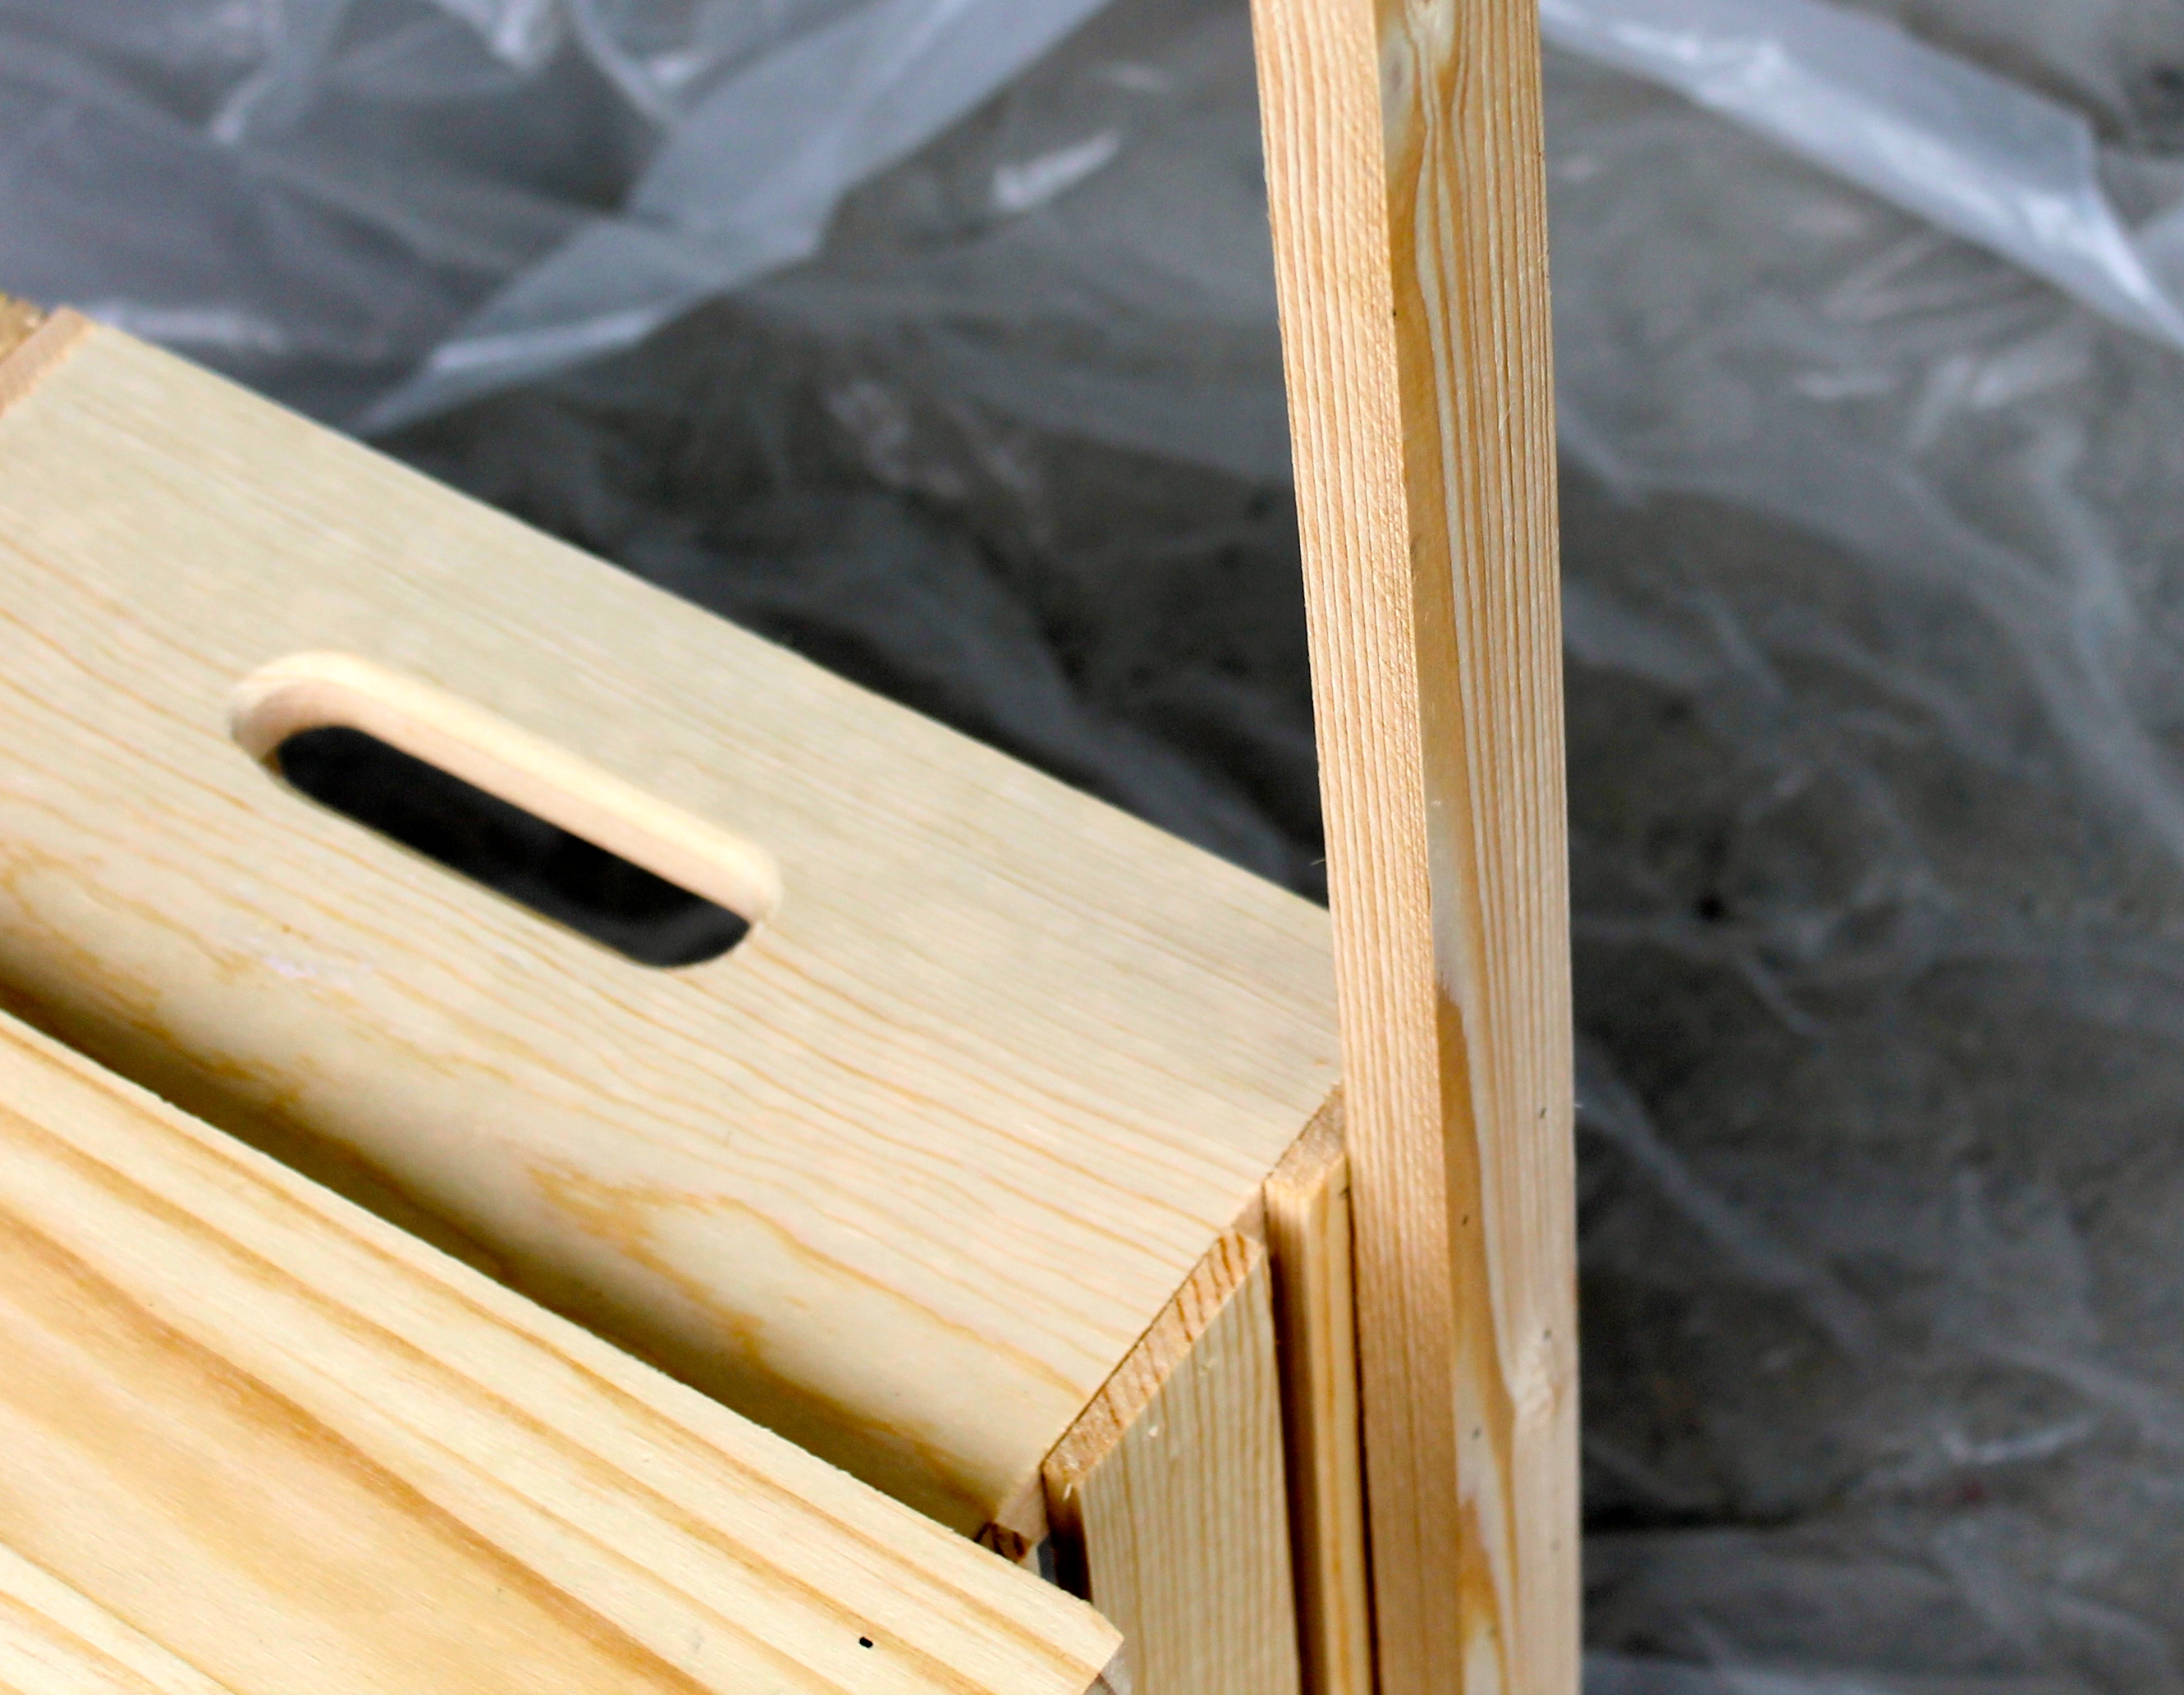
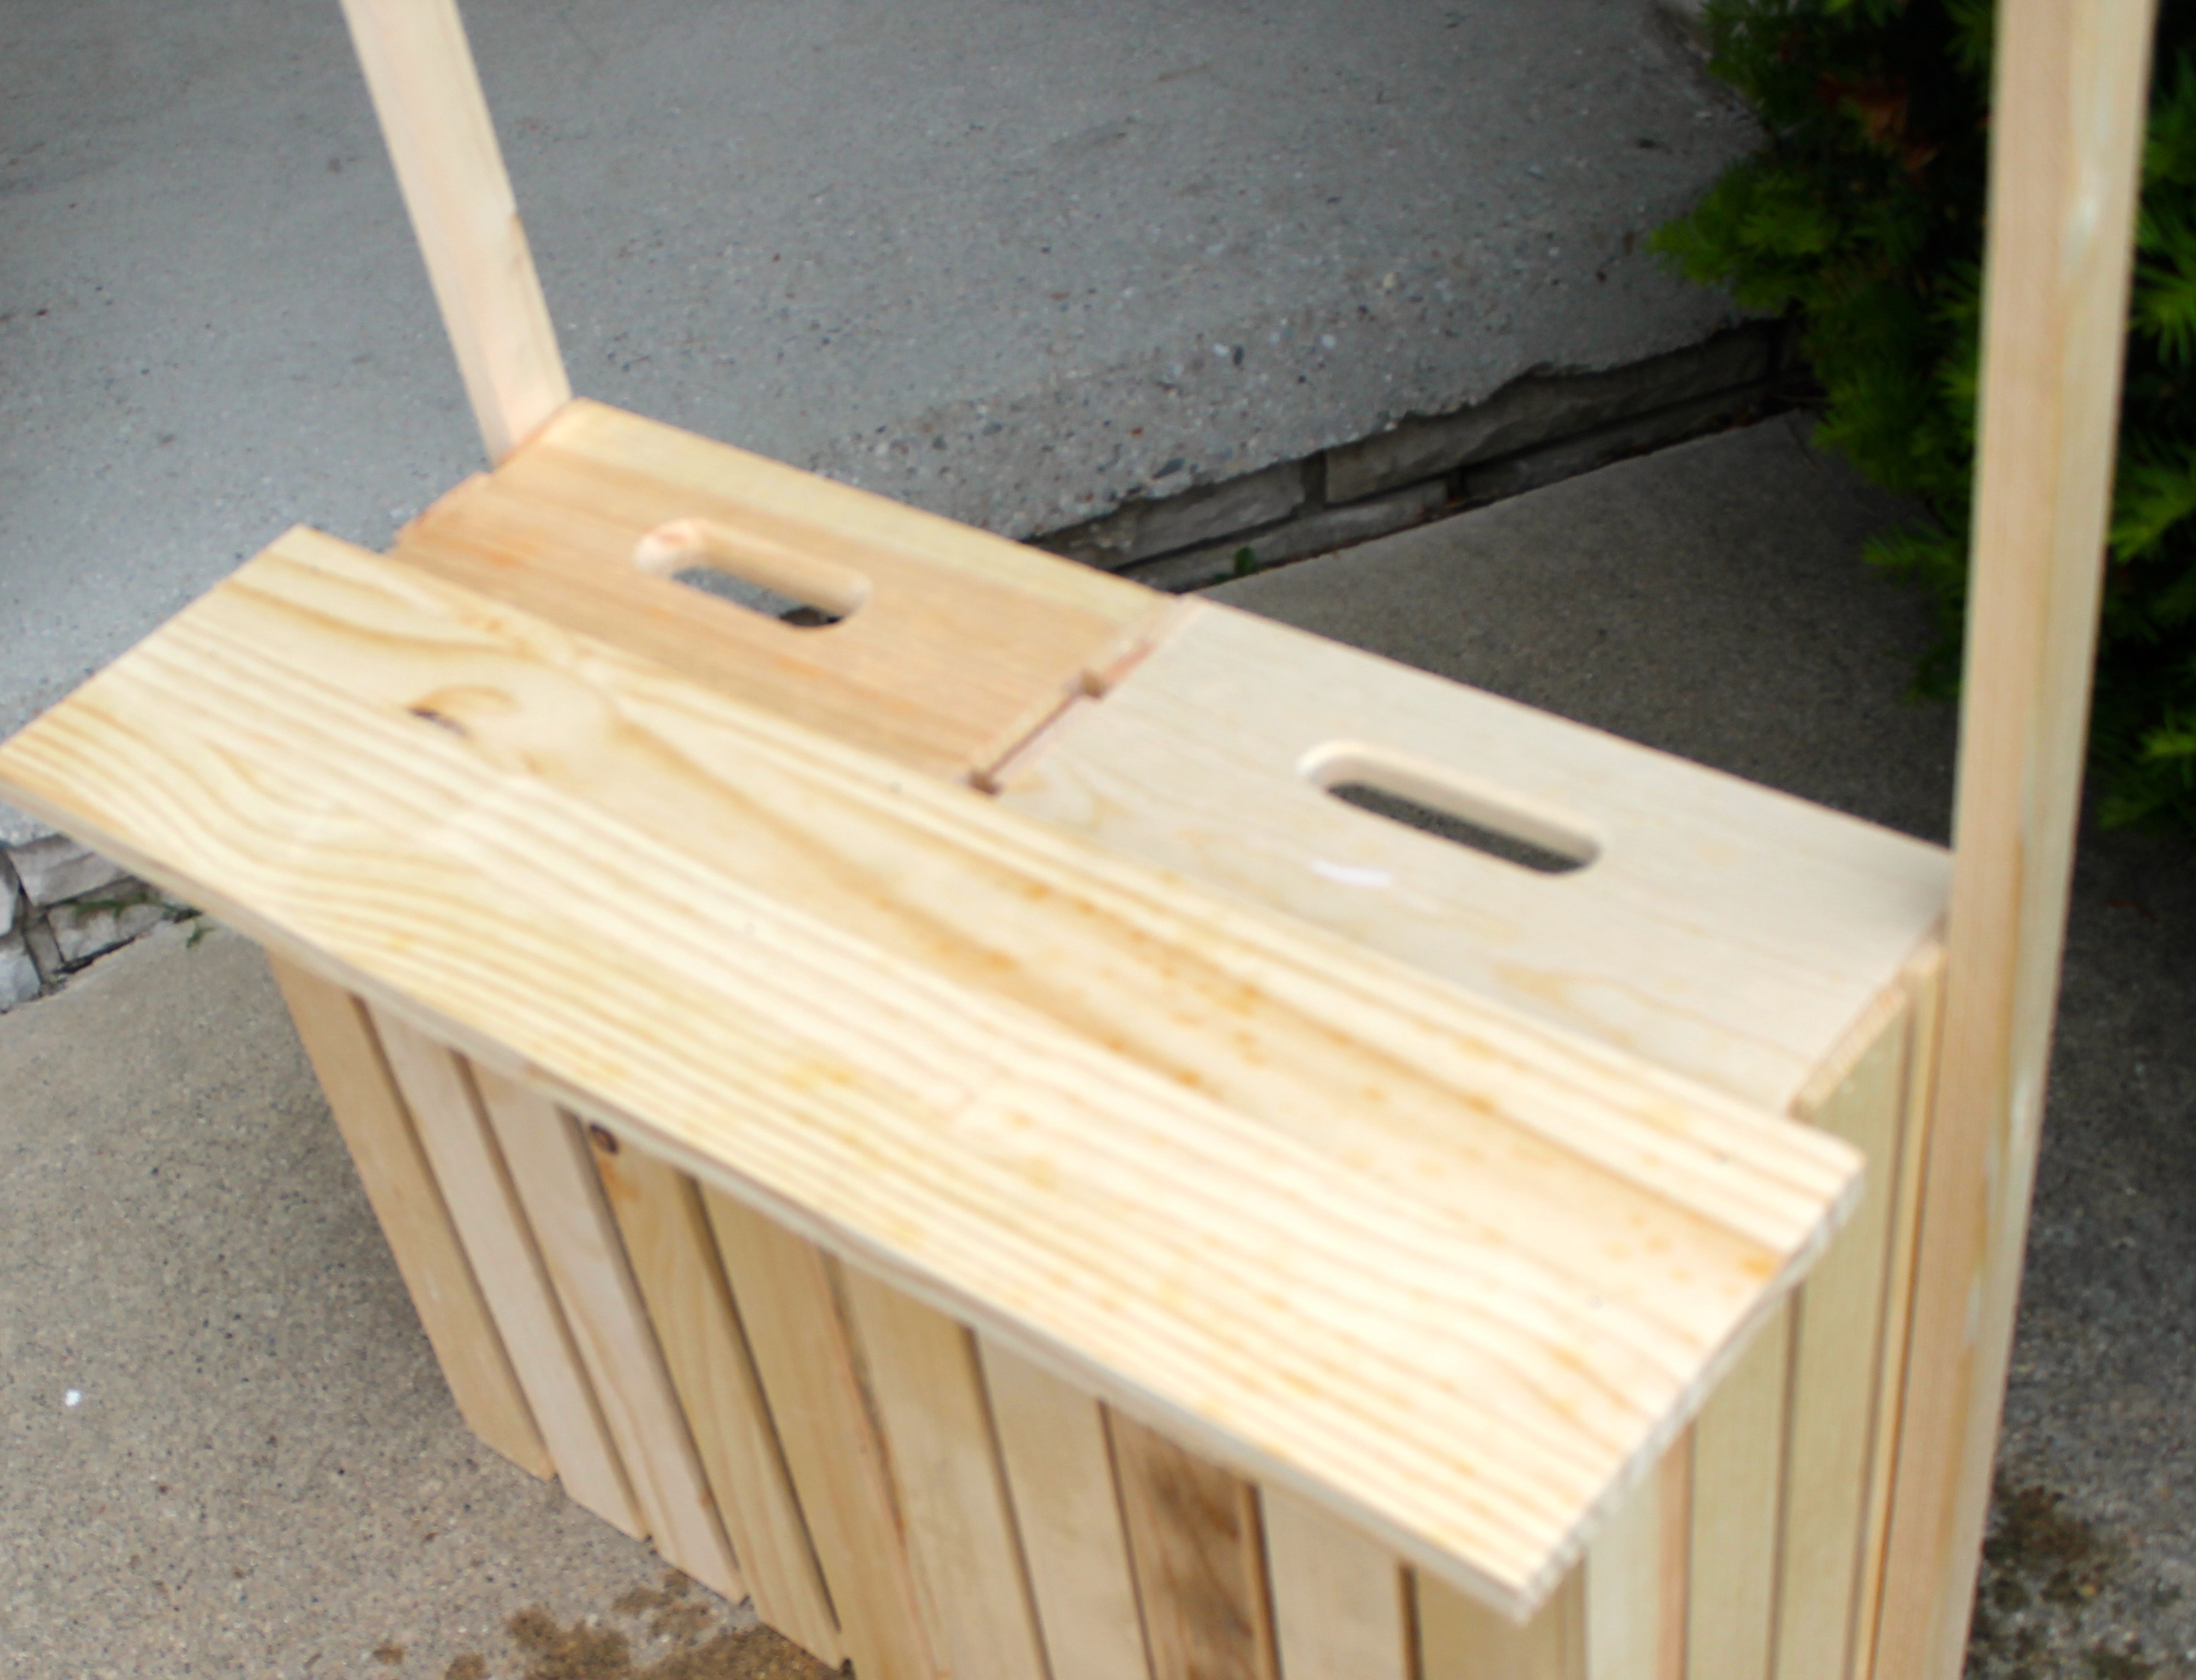
Step 3: Nail the two crates together by nailing (4) of your (6) 16 Inch support boards in the back 4 corners. (This is where my directions differ slightly from Vanessa’s: I decided to move the support boards to the back of our crates as I wanted to have the large board and 48″ boards on the backside of the stand itself.) Make sure to put the boards in BEFORE you push the crates together to nail. I made the small error the first time around of nailing just the support board to the crate and the nails came out the other side (see below). #Woops. Thankfully I had additional wood to cover these open nails! Next, nail the last two 16 Inch support beams in the front corners for additional support.

Step 4: Nail your 48 Inch beams onto the outside of your stand, lining them up parallel to the inner 16″ boards. It should look something like this:
Step 5: Nail Your 27 x 9 Inch board at the top of the 48″ boards – see the photo below for reference.

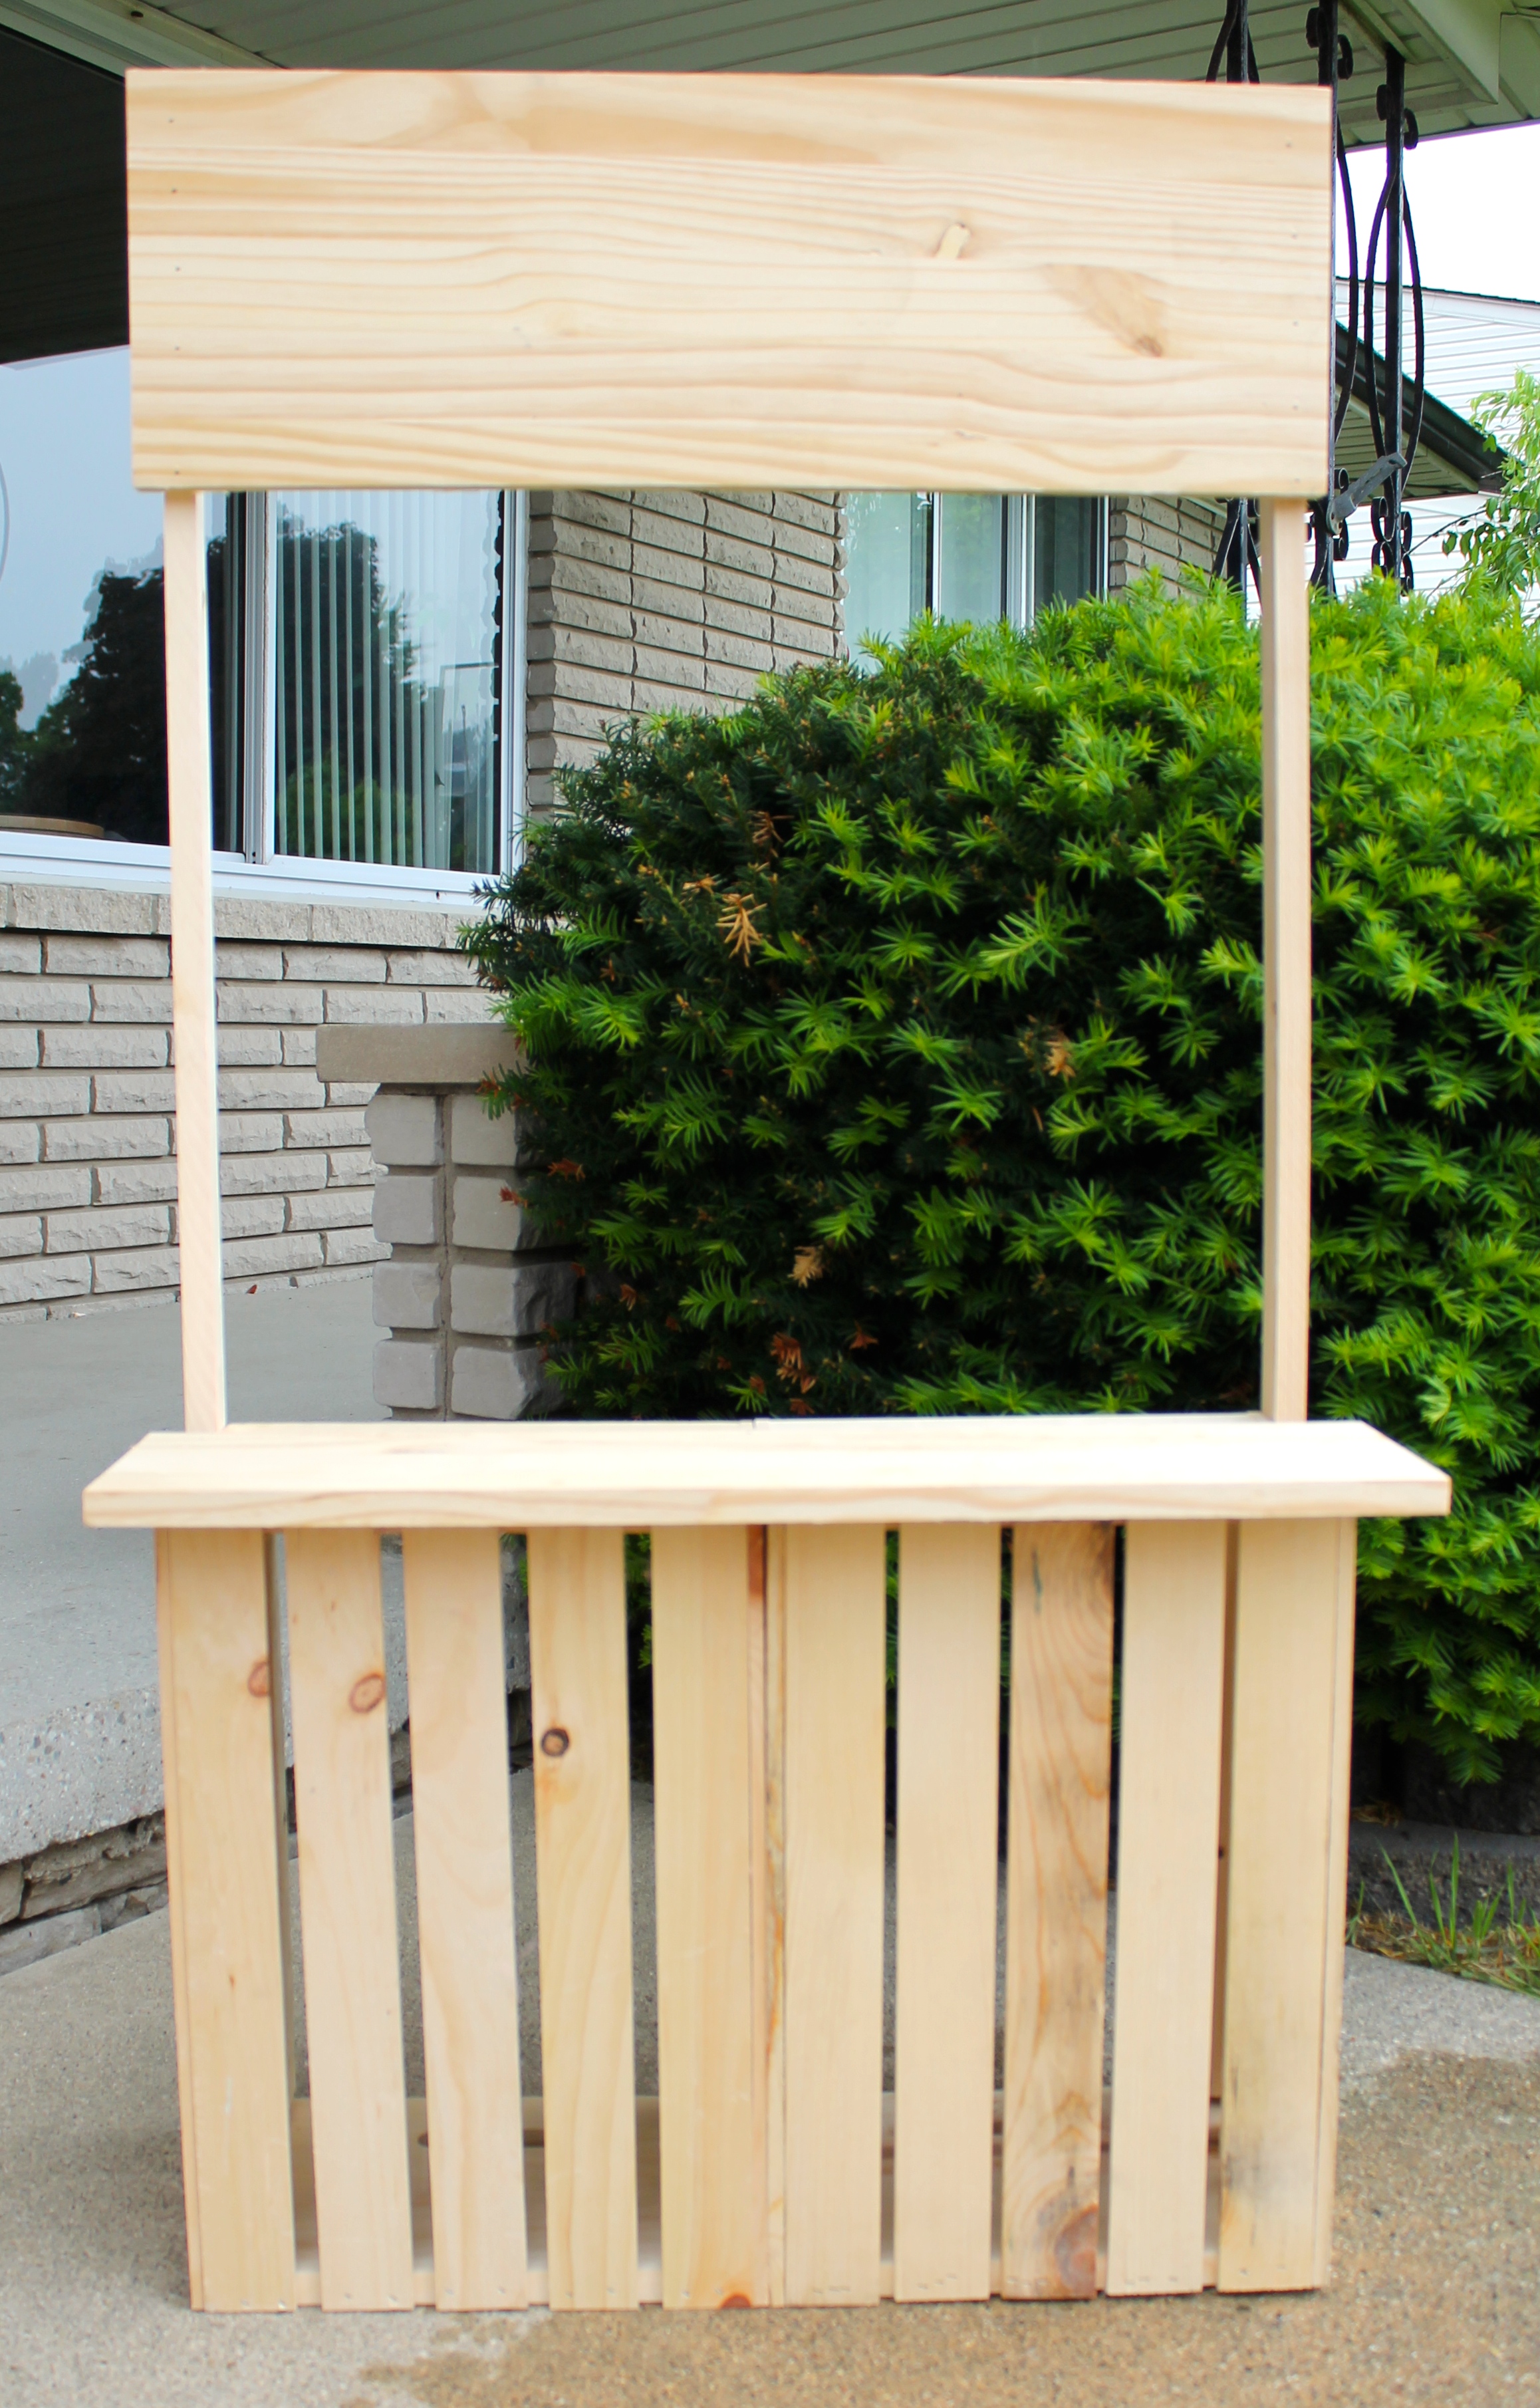
Step 6: Nail the 27 x 8 Inch Board to the top of the stand, I let the board hang over the edge to create more counter space, also creating multiple levels. (You may or may not prefer this and can cut to your preference).
Step 7: Paint Your Stand! I used about 1.5 cans of the Valspar Outdoor Spray Paint. Luckily we have extra for touch ups! Make sure to let dry overnight before decorating!


Step 8: Print a lemonade sign and hang in your 4×6 frame. You may wish to paint your frame to match before – allow time to dry if you wish to do so! Nail a single nail into the front and center of your stand. Hang your frame!

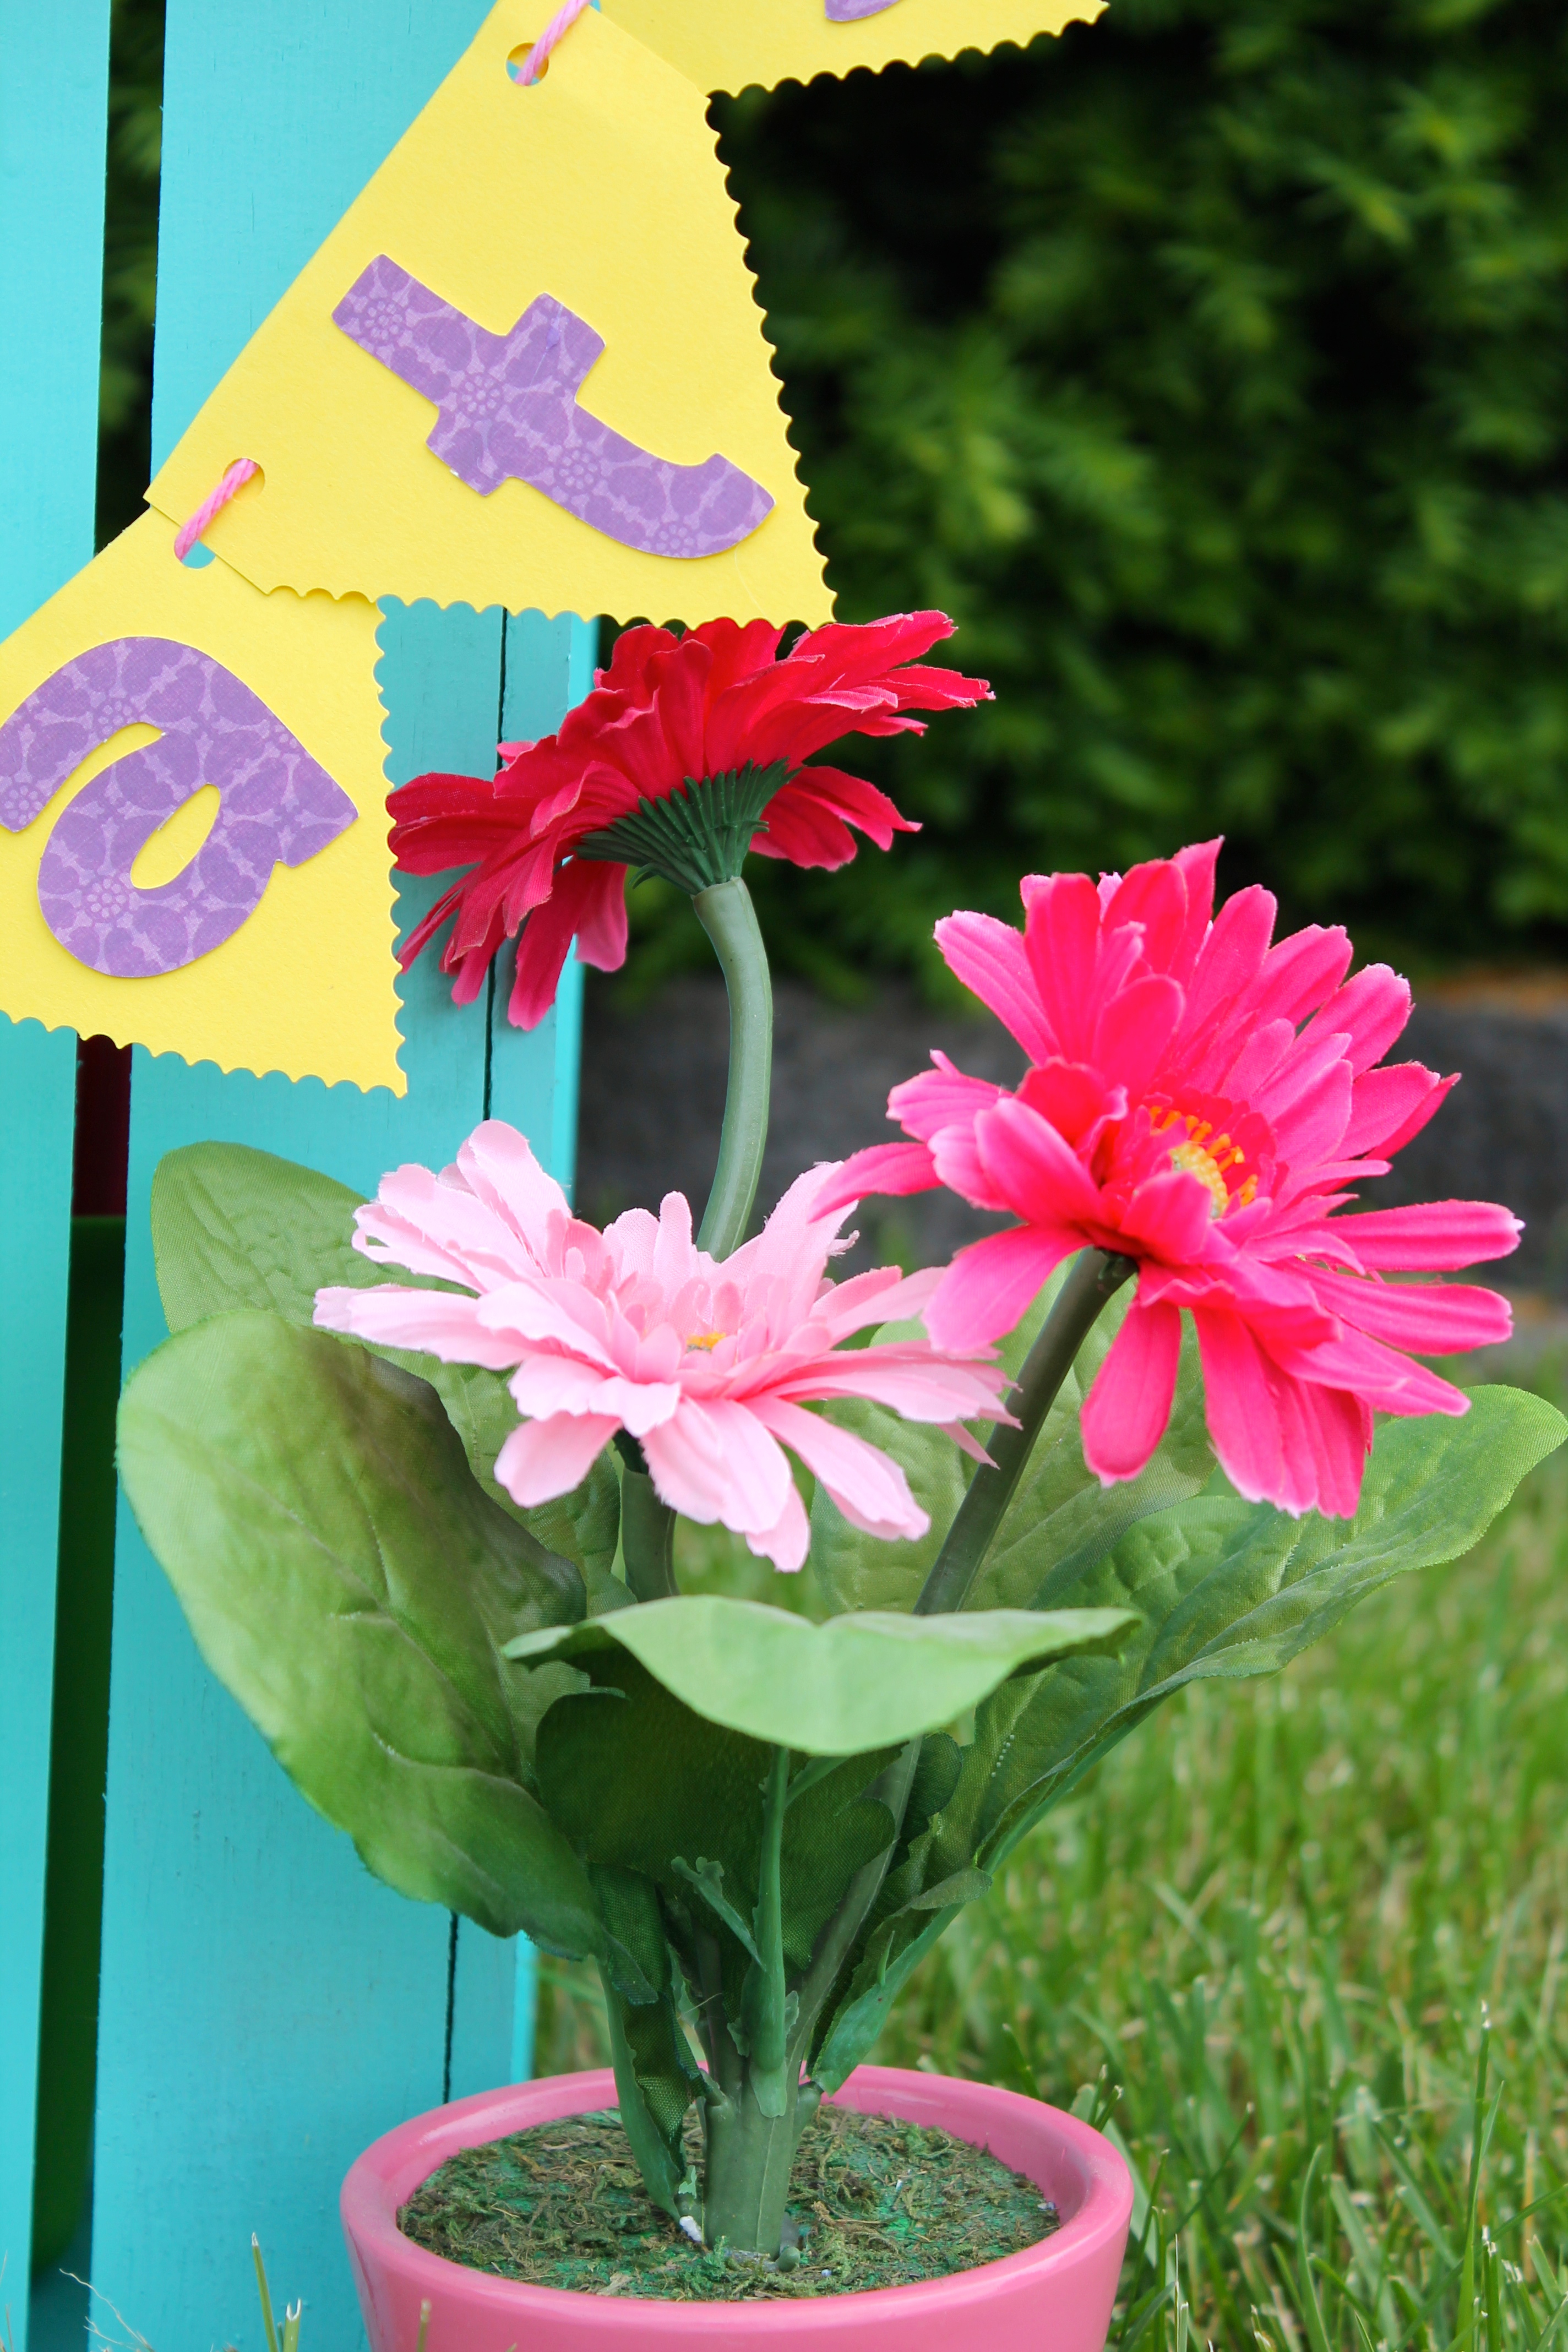
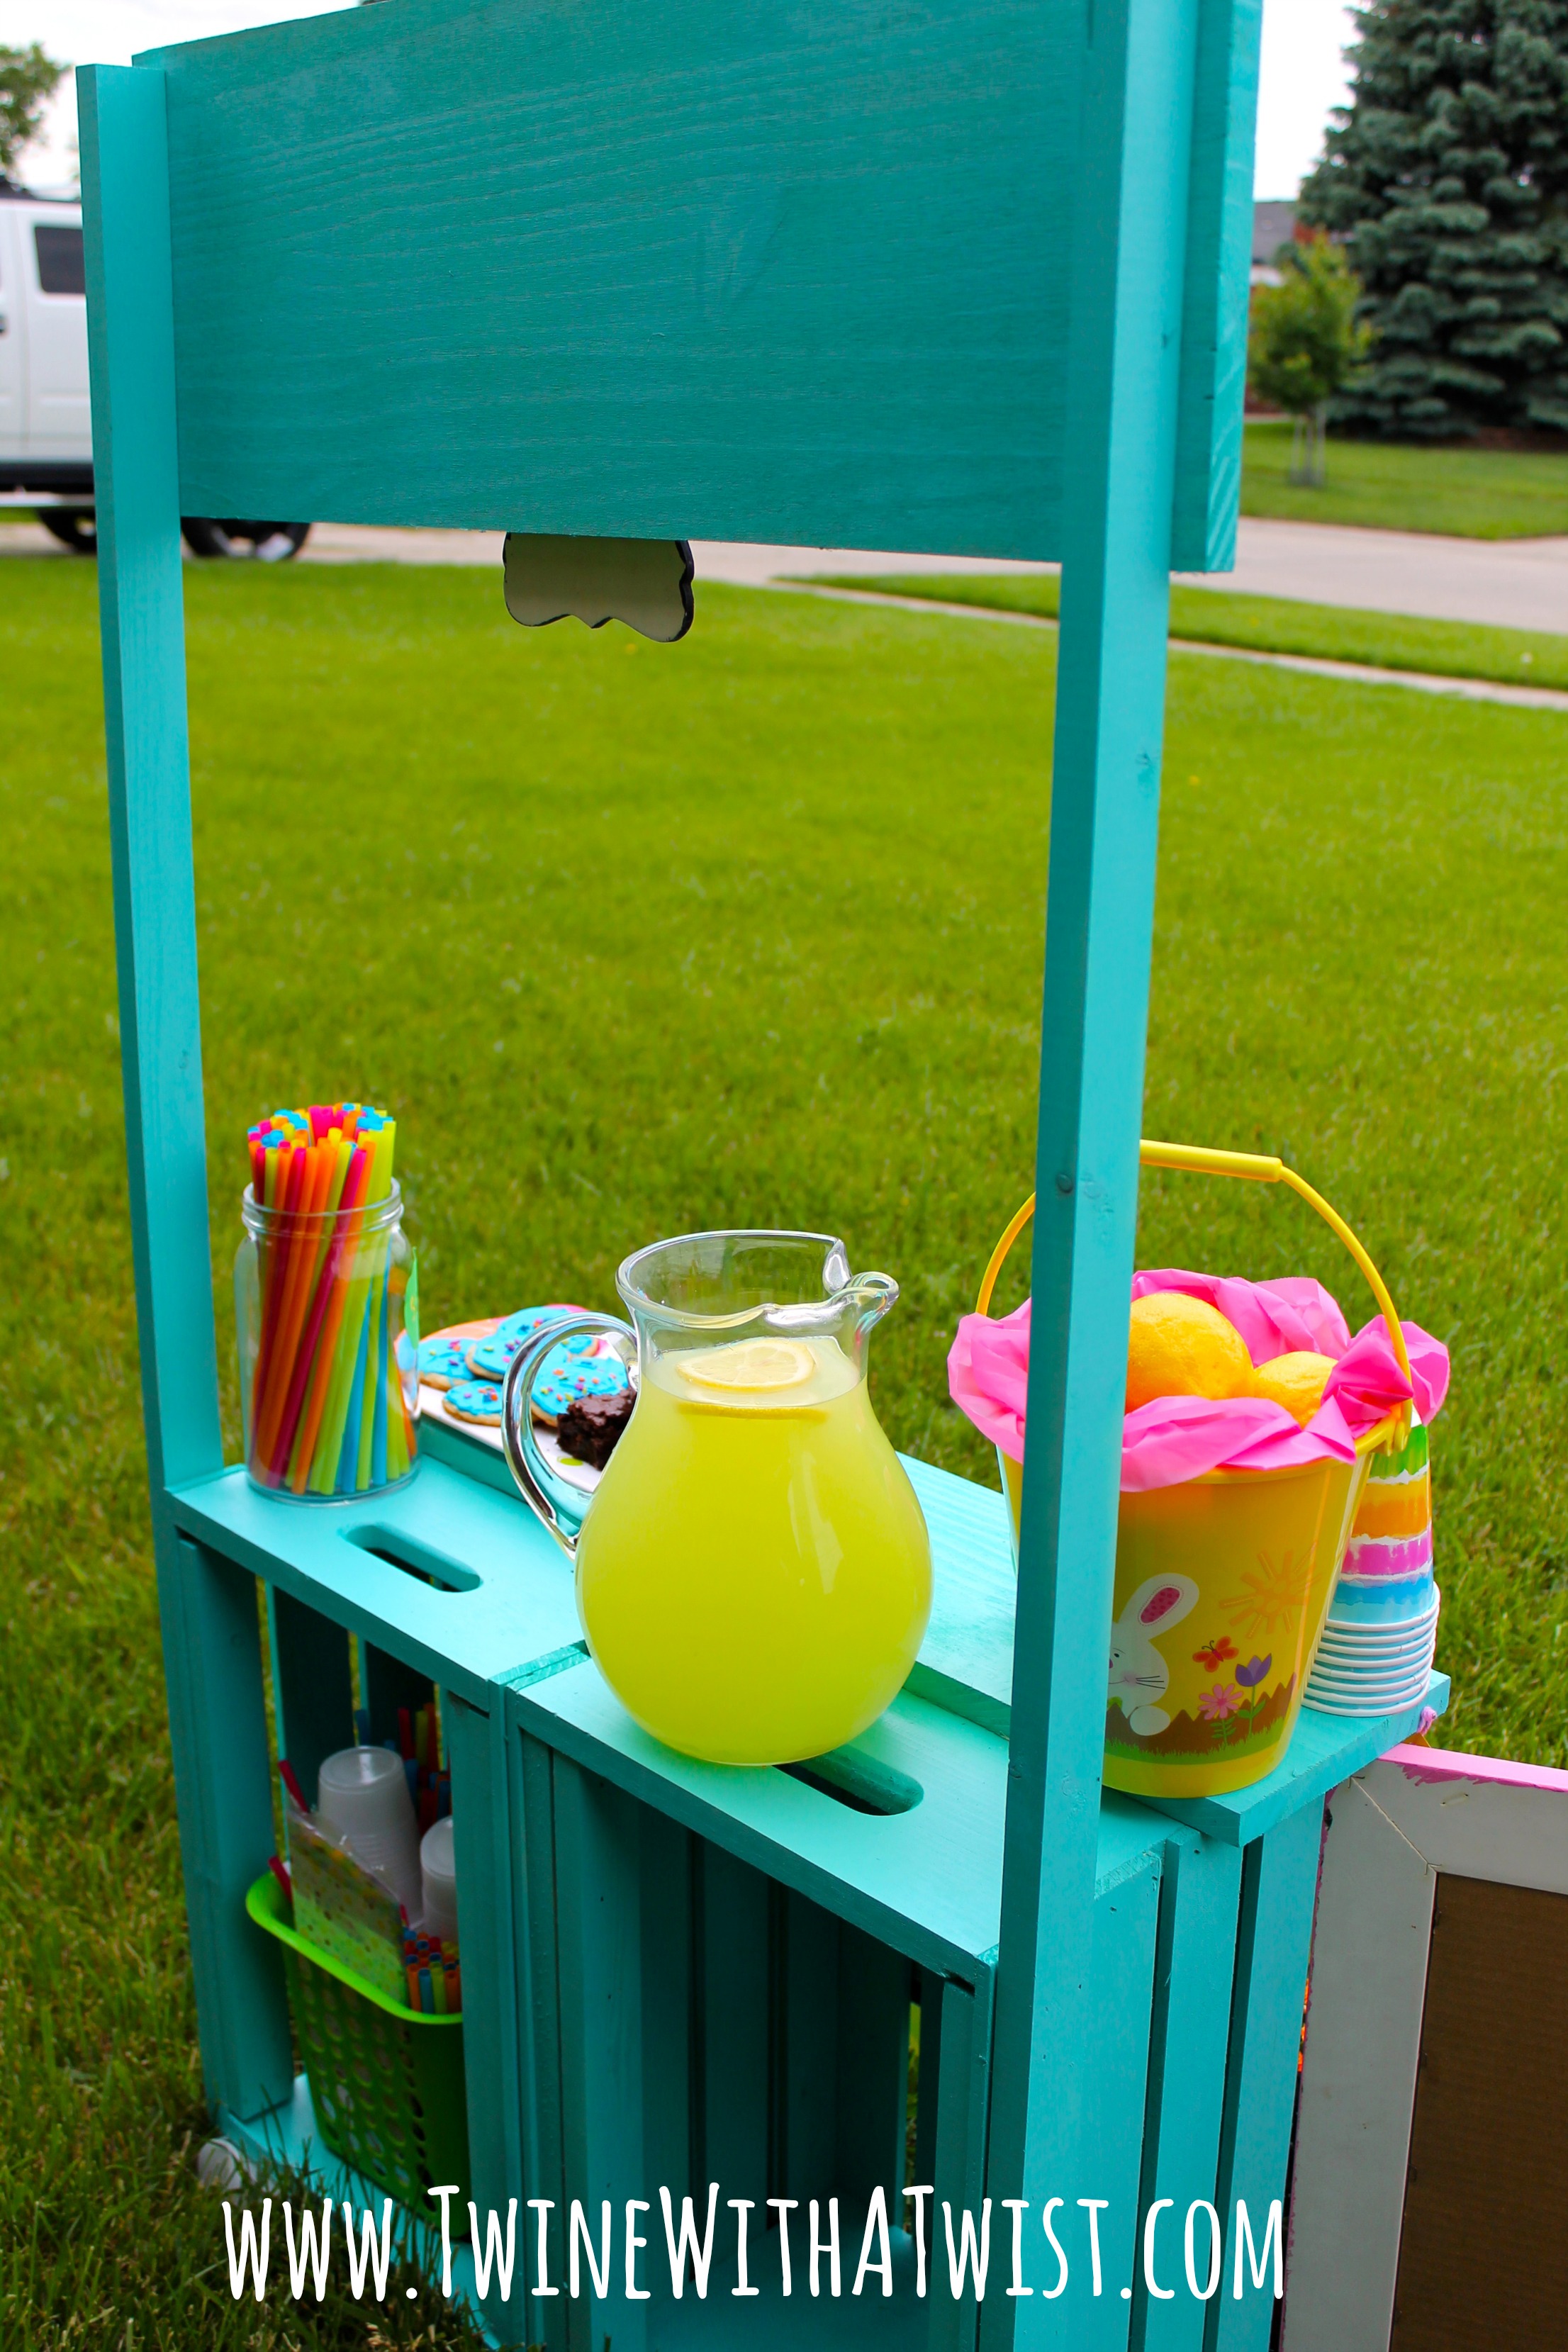
Step 9: Decorate Your Booth! This is the fun part. Get creative and match to your personal taste! I wanted to utilize bright colors so we decided on a variety of fun and summery shades! Our banner was created with the Cricut along with the stencil I designed to paint “Lemonade Stand” on the board. We finished it off with some bright decor, a small chalkboard sign, my daughter’s handprint and a few potted flowers. We even grabbed Paige’s favorite Chalkboard frame to display a daily menu!


Step 10: Make a pitcher of lemonade, bake a few treats, and hit the streets! Your new Lemonade Stand is ready for use!


For more information regarding ALHS or how our fundraising efforts turned out, please read more about it HERE and TODAY, this same post is being featured with Chelsee so don’t forget to stop on by Southern Beauty Guide for a few good reads {as always} by Chelsee!

Cheers!


Almost like my tutorial I did a few years ago. :). http://mysimpleobsession.blogspot.com/2012/09/building-lemonade-stand.html
I love how yours turned out!!
Sarah
LikeLike
Ahh! I love yours too! I found so many different styles on Pinterest it was crazy! I love pinning for hours, I could have found another 50! 🙂
LikeLike
Haha, now that I notice, I have yours pinned too!! 🙂
LikeLike
Love love love! Extremely cute! I would love it if you joined and contribute your awesome posts at my link party at City of Creative Dreams, starts on Fridays 😀 Hope to see you there at City of Creative Dreams Link Party.
LikeLike
Thank you! I will definitely contribute right now!! 🙂
LikeLike
This is the cutest lemonade stand EVER! I’m featuring it as one of my link party favorites from Inspire Me Wednesday this week. Thanks so much for linking up! 🙂
LikeLike
Thanks so much for the link! I absolutely LOVE Inspire me Wednesday – I follow along every week!! ❤
LikeLike
Pingback: I'm Feeling Inspired! Link Party Features - Happiness is Homemade
Pingback: DIY Frozen Hot Chocolate – The Perfect Summer Treat! * |
Thank you for sharing this post at City of Creative Dream’s City of Links on Friday! I appreciate you taking the time to party with me. Hope to see you again this week 🙂
LikeLike
Thanks again Shanice!
LikeLike
Any way to make this taller…any suggestions. I have a 9 year old and it looks too short for her. Could I nail two of the crates on top of each other…so in essence I would have a total of crates used.
LikeLike
Totally! Perhaps turn the crates horizontal to use four? That should make a better height for an older age. Thanks for reading!
LikeLike