DIY Frozen Hot Chocolate – The Perfect Summer Treat! *

Come one, come all: It’s Twine With A Twist’s weekly installment of “Do It Yourself Thursdays” and this week I’m featuring my Frozen Hot Chocolate! It’s incredibly simple and can be made with ingredients that you probably already have lying around your home – Yay for that!

DIY Frozen Hot Chocolate.jpg

This recipe is beyond tasty and with just over a minute of spare time, you can be serving one of the most delicious drinks your friends have had all summer! With some simple directions and a mgic bullet or blender, you’re on your way to making you next addiction!

ingredients .jpg


  • Ice (1 1/2 cups)
  • Milk (1 cup)
  • Hot Coco Mix (1 packet -With Marshmallows Is Best!)
  • French Vanilla Cream (A Splash To Taste)
  • Reddi Whip – (Chocolate)

DIY Frozen Hot Chocolate

Now I know that most of you have over half these items in your home already, but if you don’t – they are incredibly cheap! You of course can substitute your milk, creamer and coco mix to your preference but I definitely recommend the chocolate Reddi Whip- It’s a deal breaker!! I picked mine up for $2 and the coco mix was only $1.29! all the ingredients listed above make up to 10+ beverages and it was altogether less than $9 for the items you see (That’s less than 90 cents per drink!! – Talk about a bargain beverage. Skip the drive-thru and hefty prices for your next frozen treat, this is totally worth it!

directions.jpg


  1. Fill your blender or bullet (what I’m using) with 1 and a half cups of ice.
  2. Pour 1 cup of milk into the blender (or until it’s just above the ice).
  3. Add a tablespoon or so of French Vanilla Cream (To taste).
  4. Place the lid on and blend until smooth – Add milk as needed.
  5. Pour and top with Reddi Whip. – Enjoy! ♥

IMG_4052.jpg

So go ahead and try this refreshing twist on an old treat and let me know how yours turns out! Also, make sure you stop on over to Artsy Corner Thursday’s with Artsy Fartsy Mama & Cox’s Corner to share your own DIY projects & recipes! Twine With A Twist was Featured last week for the DIY Lemonade Stand! ♥ Thanks Ladies!!


Thanks for stopping by for Do It Yourself Thursdays @ Twine With A Twist! See you next week.

Cheers,

Screen Shot 2014-06-10 at 10.51.29 PM


DIY :{Simple}: LeMoNaDe Stand! *

Lemonade Stand

So with summer in the works and a restless toddler on my hands, I recently took to Pinterest for some good ol’ fashioned inspiration! You see, last year I came across an event that was truly touching, Alex’s Lemonade Stand Foundation‘s National Lemonade Days – An annual event that raises money for all forms of childhood cancer through the act of selling lemonade. Unfortunately, I had come across the event about two weeks too late, but I vowed to remember it this time around. Sure enough, as spring sprung, I took to the pins to search out the perfect lemonade stand just in time for the 10th anniversary of ALSF, and we found it!

DIY Lemonade Stand

Compliments of Vanessa over at See Vanessa Craft, we were provided the perfect plans to construct a quick, affordable and sturdy little Lemonade Stand! After reviewing the plans that Vanessa provided, I decided to make a few small adjustments of my own. Nothing drastic but just a few differences to note.

Below are the supplies and directions for the Lemonade Stand my daughter and I put together:

Supplies


(2) Unfinished Wood Crates – Found At Michaels (12.5 x 18 x 9.75 Inches)

  • $13.99 per crate – 2 x 50% off Coupons – $13.92 

(2)  8 Foot Boards (1 1/2 x 3/4 Inches Thick) CUT TO:

(2) 48 inch Long Boards

(6) 16 inch Support Boards

  • $2.98 per board-  $5.96

(1) 16 x 36 Inch Pine Board  (3/4 Inches Thick) CUT TO:

(1) 27 x 9 Inches

(1) 27 x 8 Inches

Left Over Wood: 16 x 9 Inches – Would Work Great For A Menu Sign!

  • $6.90

 – Nails & Hammer – A Nail Gun If You Have One (This Really Helped To Speed Up Our Process!)

  • Free- Already Owned

(2) Cans Of Valspar Outdoor Spray Paint – Color Optional – I used “Koi Pond”.

  • $4.98 per can – $9.96

(1) 4×6 Inch Photo Frame (Of Your Choice)

  • $1.00 

(1) Lemonade Print – 4×6 Inches

Additional Paint, Paper Banner & Stencil Supplies:

  • $2.00 – Miscellaneous Acrylic Paints / Stencil – FREE – Created With Cricut / Paper – FREE.

TOTAL:  $39.74

With a budget you can work with, this stand is easy on the wallet. To believe the compliments I received on such a frugal project! I was incredibly thankful for Vanessa’s plans. Now, on to the directions!

Directions .jpg


Step 1: Buy your materials and if possible (I Highly Recommend This), have one of the employees at your local hardware store cut the wood for you to size! I’m personally no good with our table saw and I’m pretty sure that’s not the best option for this project anyhow, I opted for the “please help me” look and it worked. You can too!

Step 2: Lay out all your supplies to get organized. This works best for me so that I don’t go losing things. It’s also helpful when your toddler is feeling in a helpful mood. . .

Directions 1

IMG_3912

IMG_3917 IMG_3918

Step 3: Nail the two crates together by nailing (4) of your (6) 16 Inch support boards in the back 4 corners. (This is where my directions differ slightly from Vanessa’s: I decided to move the support boards to the back of our crates as I wanted to have the large board and 48″ boards on the backside of the stand itself.) Make sure to put the boards in BEFORE you push the crates together to nail. I made the small error the first time around of nailing just the support board to the crate and the nails came out the other side (see below). #Woops. Thankfully I had additional wood to cover these open nails! Next, nail the last two 16 Inch support beams in the front corners for additional support.

IMG_3924

Step 4: Nail your 48 Inch beams onto the outside of your stand, lining them up parallel to the inner 16″ boards. It should look something like this:

IMG_3934

 Step 5: Nail Your 27 x 9 Inch board at the top of the 48″ boards – see the photo below for reference.

IMG_3930
IMG_3927

Step 6: Nail the 27 x 8 Inch Board to the top of the stand, I let the board hang over the edge to create more counter space, also creating multiple levels. (You may or may not prefer this and can cut to your preference).

IMG_3928

Step 7: Paint Your Stand! I used about 1.5 cans of the Valspar Outdoor Spray Paint. Luckily we have extra for touch ups! Make sure to let dry overnight before decorating!

IMG_3935 IMG_3936

 Step 8:  Print a lemonade sign and hang in your 4×6 frame. You may wish to paint your frame to match before – allow time to dry if you wish to do so! Nail a single nail into the front and center of your stand. Hang your frame!

IMG_3940

 Step 9: Decorate Your Booth! This is the fun part. Get creative and match to your personal taste! I wanted to utilize bright colors so we decided on a variety of fun and summery shades! Our banner was created with the Cricut along with the stencil I designed to paint “Lemonade Stand” on the board. We finished it off with some bright decor, a small chalkboard sign, my daughter’s handprint and a few potted flowers. We even grabbed Paige’s favorite Chalkboard frame to display a daily menu!

Lemo 14.jpg

IMG_3950 IMG_3948Lemo 9.jpgIMG_3942 IMG_3941

Step 10: Make a pitcher of lemonade, bake a few treats, and hit the streets! Your new Lemonade Stand is ready for use!

results .jpg

Lemo 1.jpg Lemo 2.jpg Lemo 3.jpg Lemo 4.jpg Lemo 5.jpg Lemo 6.jpg Lemo 7.jpg Lemo 8.jpg Lemo 10.jpg Lemonade Stand Lemo 12.jpg Lemonade Stand

For more information regarding  ALHS or how our fundraising efforts turned out, please read more about it HERE and TODAY, this same post is being featured with Chelsee so don’t forget to stop on by Southern Beauty Guide for a few good reads {as always} by Chelsee!

Screen Shot 2014-06-10 at 10.53.45 PM

Cheers!

Screen Shot 2014-06-10 at 10.51.29 PM


A Simple DIY – Fabric Covered Boxes. *

Today’s DIY is all about simple solutions to creative storage! When creating my Craft Room this past spring, I knew I needed to find additional storage solutions for some of my miscellaneous materials. With a limited budget and a lot of boxes, I came to the crafty conclusion that I needed to find a frugal solution. I decided to once again utilize some of my fabric scraps to create a project that could both match the current decor and get rid of some materials I already had lying around. With that, I bring you: Fabric Covered Boxes – A Simple DIY!

fabric Boxes .jpg

When it came to this project, I was a last-minute idea that I opted for as the solution was something I could easily put together with supplies just lying around. I had a variety of boxes just scattered about our garage that I would have otherwise tossed in the trash if not for this last minute idea. I have always adored the little fabric boxes at the craft stores but don’t want to shell out $15 and up per box. While our craft room is mainly Ikea shelving, we knew that the $13.00 boxes they sell in store were cute, but financially NOT an option. I could never spend that much! With that I found an alternative to each cube. . . but I still needed more room! That’s where the fabric and old boxes comes in. . . .

For supplies, lets keep is short and simple:

  • Cardboard Box(es) – Any Size
  • Fabric – Enough to wrap the outside of your box with about an inch of additional overhang.
  • Staple Gun
  • Staples

When deciding on this project, I went with staples. I just LOVE my staple gun because it’s quick and efficient. After creating this post I have since discovered that some people opted for glue. This is totally up to you and I will not pretend that everyone has a staple gun. (Technically I don’t even have one, it’s my father in-law’s gun but I’ve had it over a year and I’m pretty sure he’s since forgotten. #ThanksPat). I also realize that a lot of people have covered boxes with lids, I however did not. I didn’t have any boxes lying around with lids at the time and didn’t require them for this project. If you would like to cover the lid in fabric the directions would be exactly the same. If you do, I would love to see the results!!

So on to the Directions:

Step one: Find some cardboard boxes!

IMG_3875

IMG_3877

I decided on a Meijer diaper box and a Costco Waffle Box. #TheInnerWorkingsOfMyWorld. Both were empty and ready for trash day, until I came to the rescue!

Step Two: Find Your Fabric.

IMG_3874

I always opt for the fabrics that I have lying around. If you’re anything like me, you probably have plenty of random scraps in a variety of size. If not, this project utilized less than a yard of fabric for both boxes. I decided on two different fabrics as they provided the most room for error along with some fun colors !

Step Three: Grab Your Staple Gun & Load With Staples!

IMG_3878

Step Four: Iron Your Fabric!! – This is a step that I forgot and couldn’t have been more annoyed! Once I wrapped my boxes, stapled and stuffed with goodies – I realized that one of the boxes had a big fat crease (or three)  in the fabric. #mortifying. As I’m completely lazy and slightly laid back, I just left it. . . but if I had the chance to do it again, I would have made the extra effort.

IMG_3888

 Step Five: Lay your box – open end up – directly in the middle of your fabric. Fold each side of the fabric up so that it covers each side of the box and then fold the additional 1 inch overlay over the inside edge of your box. I wrapped my box as if I was wrapping a present and wanted to keep the fold to accent the pattern. If you’re looking to have no folds showing, fold each corner at a 45 degree angle and cut off the additional fabric before you overlay your edges. Regardless of your folds, make sure the fabric is tightly wrapped.

IMG_3897

IMG_3884

 Step Six: Start Stapling!

IMG_3881

IMG_3880

Now if you ask me, you can never have enough staples. I’ll admit, now that I’m looking at these photos, I may have gotten a little trigger happy- but hey, at least it’s secure! Make sure when stapling the fabric to the inside of your box that you’re consistently pulling your fabric tight to avoid and ripples in the fabric!

Step 7: Step Back & Admire! – Fill with whatever your little heart desires!

IMG_3898

IMG_3893

IMG_3907

IMG_3892

IMG_3900

IMG_3889

IMG_3904


So That’s It! In less than 15 minutes you can have some incredibly cute storage solutions and you didn’t have to spend a penny! (Unless you of course opted to buy new fabric. . . .which in that case, I commend you for making the extra effort and hopefully you didn’t spend too much!!) This is one of those projects that just makes me smile. I always enjoy getting something out of nothing! – To think these boxes were almost trash!

Have any of you ever created something cute out of a lot of nothing just lying around? I love to hear about new DIY’s! Also, for a fun Thursday Link-Up, make sure you check out Lindsay over at Artsy Fartsy Mama for her crafty and creative Artsy Corner Thursdays! Share your current projects and meet new people!

Cheers!

Screen Shot 2014-02-14 at 4.35.08 PM


Free Easter Prints! *

So to kick off this obnoxious Monday I wanted to leave you all a little something you could call your own. As mentioned in past posts, I figured that Easter would be my next installment of FREE Prints for all! With that being said, I got a little font happy and am dishing out more than your average number of freebies, but who doesn’t love a good variety?

I would like to apologize that these prints are coming out so late today, had another hell-filled day of limited internet down-town this morning and couldn’t get a single thing accomplished at work, which means I of course got nothing on here accomplished either. #Boo.

For what it’s worth I’m giving you free shit, so bear with me here ok? Any-who, here are a few prints that are spring inspired along with some good ol’ fashion Baby Jesus lovin’. Get to printing people!

Free Easter Prints

For your free prints, click on the links below each print to download the PDF attachment and ENJOY! 

Free Easter Print #1 - 8x10

Click To Download:  Free Print #1

Free Easter Print #2 - 8x10

Click To Download:  Free Print #2

Free Easter Print #3 - 8x10

Click To Download:  Free Print #3

Free Easter Print #4 - 8x10

Click To Download:  Free Print #4

Free Easter Print #5 - 8x10

Click To Download:  Free Print #5

Free Easter Print #6 - 8x10

Click To Download:  Free Print #6

So there you have em’. Please refrain from mocking my pathetically immature prints as I reserve the “good” prints for shop. . . but I like to give back when I can. #ThankMeLater. If you find the time to utilize any of these little masterpieces, please please PLEASE snap a pic for my amusement. I would love to see if anyone ever uses these little guys!!

Cheers, 

Screen Shot 2014-02-14 at 4.35.08 PM

Friday Favorites – Fun & FREE Fonts! *

It’s FRIDAY! That’s right, and you know what that means: Friday Favorites. A time for us to share in all the wonderful things that make us happy, because why not? It’s everyone’s favorite day of the work-week and to celebrate we should bask in all that is happy. So let’s get to it!

Friday Favorites

Today’s Friday Favorites is dedicated to some of my favorite fun and FREE fonts! With so many to chose from and a never-ending afternoon of downloads ahead, each font-finding endeavor seems to take longer then the last. But why search high and low when you can simply surrender to this blog and find  fun, easy-to-download fonts with the simple click of link?! So without further ado, I give you:

Free Fonts We Love!

Screen Shot 2014-03-28 at 2.20.04 PM To Download:

Jazzy Essay
KB Zip A Dee Doo Dah
Little Bird 
Olive Tue Les Fourmis
Marcelle Script
KG Strawberry Lime-aid
Organic Fruit
Stars From Our Eyes
Orange Juice
Marketing Script
Lemon Drop

No need to thank me, I know you will all be downloading the bejeezus out of these fonts. I mean why wouldn’t you? They are just too cute. . .  and who doesn’t LOVE Free anything? I could download fonts ALL day week. (No seriously, I have been. #DontJudgeMe).

What are some of your favorite fonts? I would love to know- But really, I will probably spend the rest of the evening downloading any of your recommendations! #SuchAnExcitingLifeILive.

Happy Friday!

Cheers,

Screen Shot 2014-02-14 at 4.35.08 PM

Free St. Patty’s Day Prints! *

In honor of my FAVORITE holiday, I would like to gift you all some fun and FREE St. Patrick’s Day Prints. Decorate your home, spice up your work place. . . Hell, hang them around your local bar for all I care, just enjoy the Guinness drinking hell out of them because they are #Free!

St. Patty's Day Free Prints 8x10For your free prints, click on the links below each print to download the PDF attachment and ENJOY! 

St. Patty's Day 1 - 8x10Click To Download:

Print #1

St. Patty's Day 2 - 8x10

Click To Download:

Print #2

St. Patty's Day 3

Click To Download:

Print # 3

So there you go. . . some festive prints to celebrate this festive and forgotten (literally – you will all be black-out drunk, I know it) day. Just do me a favor, someone print one out and maybe post a picture for me so I know I don’t just do this for my own pathetic amusement. If nobody does, I’ll probably still come up with a reason to make some Easter Prints. Maybe some bunnies, eggs, a few helpless chicks. #CouldBeFun.

Oh and if you haven’t heard, I’m hosting a St. Patty’s Day Giveaway where you could win a FREE Print of your choice. . . Check it out below!

St. Patty's Day Giveaway

Click Here To Enter!

Cheers!

Screen Shot 2014-02-14 at 4.35.08 PM


St. Patty’s Day Giveaway! *

St. Patty's Day Giveaway

♥ Click Photo To Enter Giveaway! ♥

So today I decided to dabble in the art of Giveaways.  . . and can I just say, I have NOT a clue. Try not to laugh at me, I’m learning!! I figured I would give RaffleCopter a try since it’s what I’ve seen most every blog using. . . . it’s great for Facebook! Let me tell you, I was pretty please as to how easy it was to install, I even added a bit of code to sass up my page. . . .#TotallyBraggingRightNow. #DontCare. But seriously, I have no idea how to code. I watch the programmers at work in amazement each day and try to reminisce of the days when my Live Journal (Yes, I just went there) was the mecca of all online journals. My fonts were flashing, words were bold, small, tall and flickering. Every other letter was a different shade of blue and my emotion-cons were just dying for attention. I was the man (wo-man) at coding back then. . . back before everything was just a tool bar at the top of your blog. Where I went wrong? I don’t know. . . . I got lazy. But trust when I say, learn some damn code. It can do wonders.

Free Print Giveaway

Anyhow, when it came to installing this Giveaway in my post today, I had no idea that WordPress was such a brat. I mean seriously, I had run into issues with link-ups and what not in the past but it’s the only blogging platform that doesn’t support this service. (To attempt to sign up via this blog, click the Giveaway Photo at the top of this post!) So for that, I’m sorry. . . or maybe WordPress is sorry. Either way, I am going to provide the link and see what happens.

 My Rafflecopter Giveaway

#FingersCrossedPeople. If this doesn’t work, feel free to visit Twine With A Twist’s Facebook Page to enter! You can get in on the action under their “Giveaway” button!

Anyhow, here we are. . . My first giveaway, so PLEASE check it out and enjoy a FREE print on me! Happy Monday! 

Cheers! 

Screen Shot 2014-02-14 at 4.35.08 PM

Capturing Space: Create Your Craft Room On A Budget! *

Craft Room Budget.jpg

After much anticipation and a little good ol’ anxiety creativity, I have finally completed my newly remodeled Craft Room! A project that’s been long in the making, this previously useless spare bedroom has become what will now be known as “Chelsea’s Lair”. Below you will find the dictionary definition of the term Lair and have a better understanding of why it is I will be choosing this title for such a room. . . . #YesImAWildAnimal.

lair
le(ə)r/
noun
  1. a wild animal’s resting place, esp. one that is well hidden.
synonyms: denburrowholetunnelcave More

Chelsea’s Lair is going to be the perfect place to calm down and get crafty. Being the wild, chaotic and disorganized individual that I am, I can’t even begin to tell you how much it means to at last have a space in which I can truly unwind (and hide)! A colorful, calming and creative space . . . I can finally escape Life’s daily duties and comfortably update my Etsy Shop, Blog Space then go on to attempt every bat-shit-crazy Pinterest idea I can get my dirty little hands on. #ADreamComeTrue!

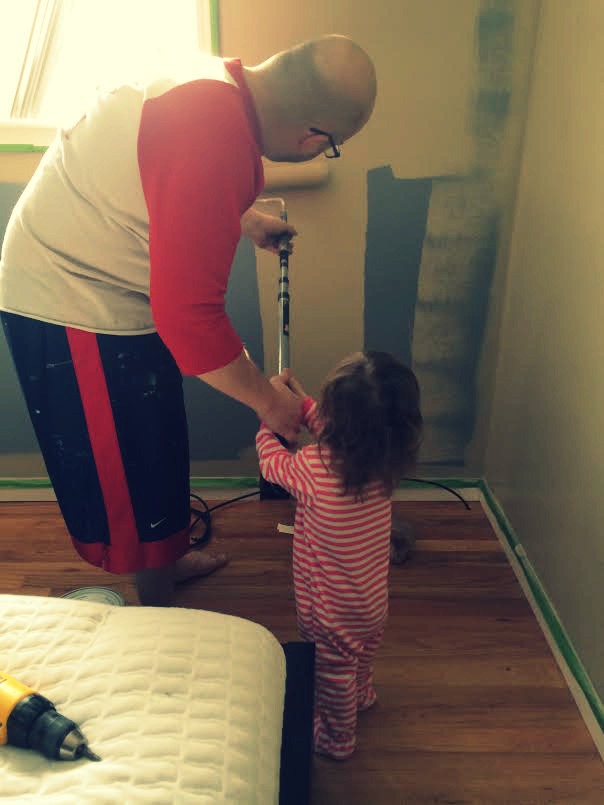
But seriously, this Lair will ultimately offer a space that Paige and I can bond in a creative environment time and again. Whether it’s painting on her easel or playing with play-dough. . . this home office/craft room will provide the perfect opportunity for playful discovery! Capturing a space that’s been so idle over the years, it’s nice to have the extra room while also finding affordability in a makeover.  So without further introduction, I present you- How To: Create Your Craft Room On a Budget!  

Craft Room On A Budget

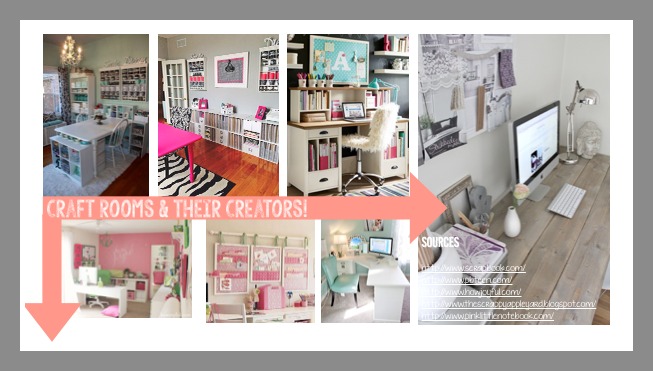
So it’s probably important that I first address my obsession with Pinterest and all the un-realistic “home office” pins you can find on that succubus. Practical? No. Visually appealing? F Yes. I am literally entranced. Crisp white counters with perfectly paired rugs . . . invisible wires (seriously though, how is your computer not dead yet?) and lamps that twinkle with glitter complimented by the vague scent of rubber cement and lavender. It’s seriously a joke right? Nobody can keep a room this organized, pretty AND productive. It’s just not possible.

Craft Rooms .jpg

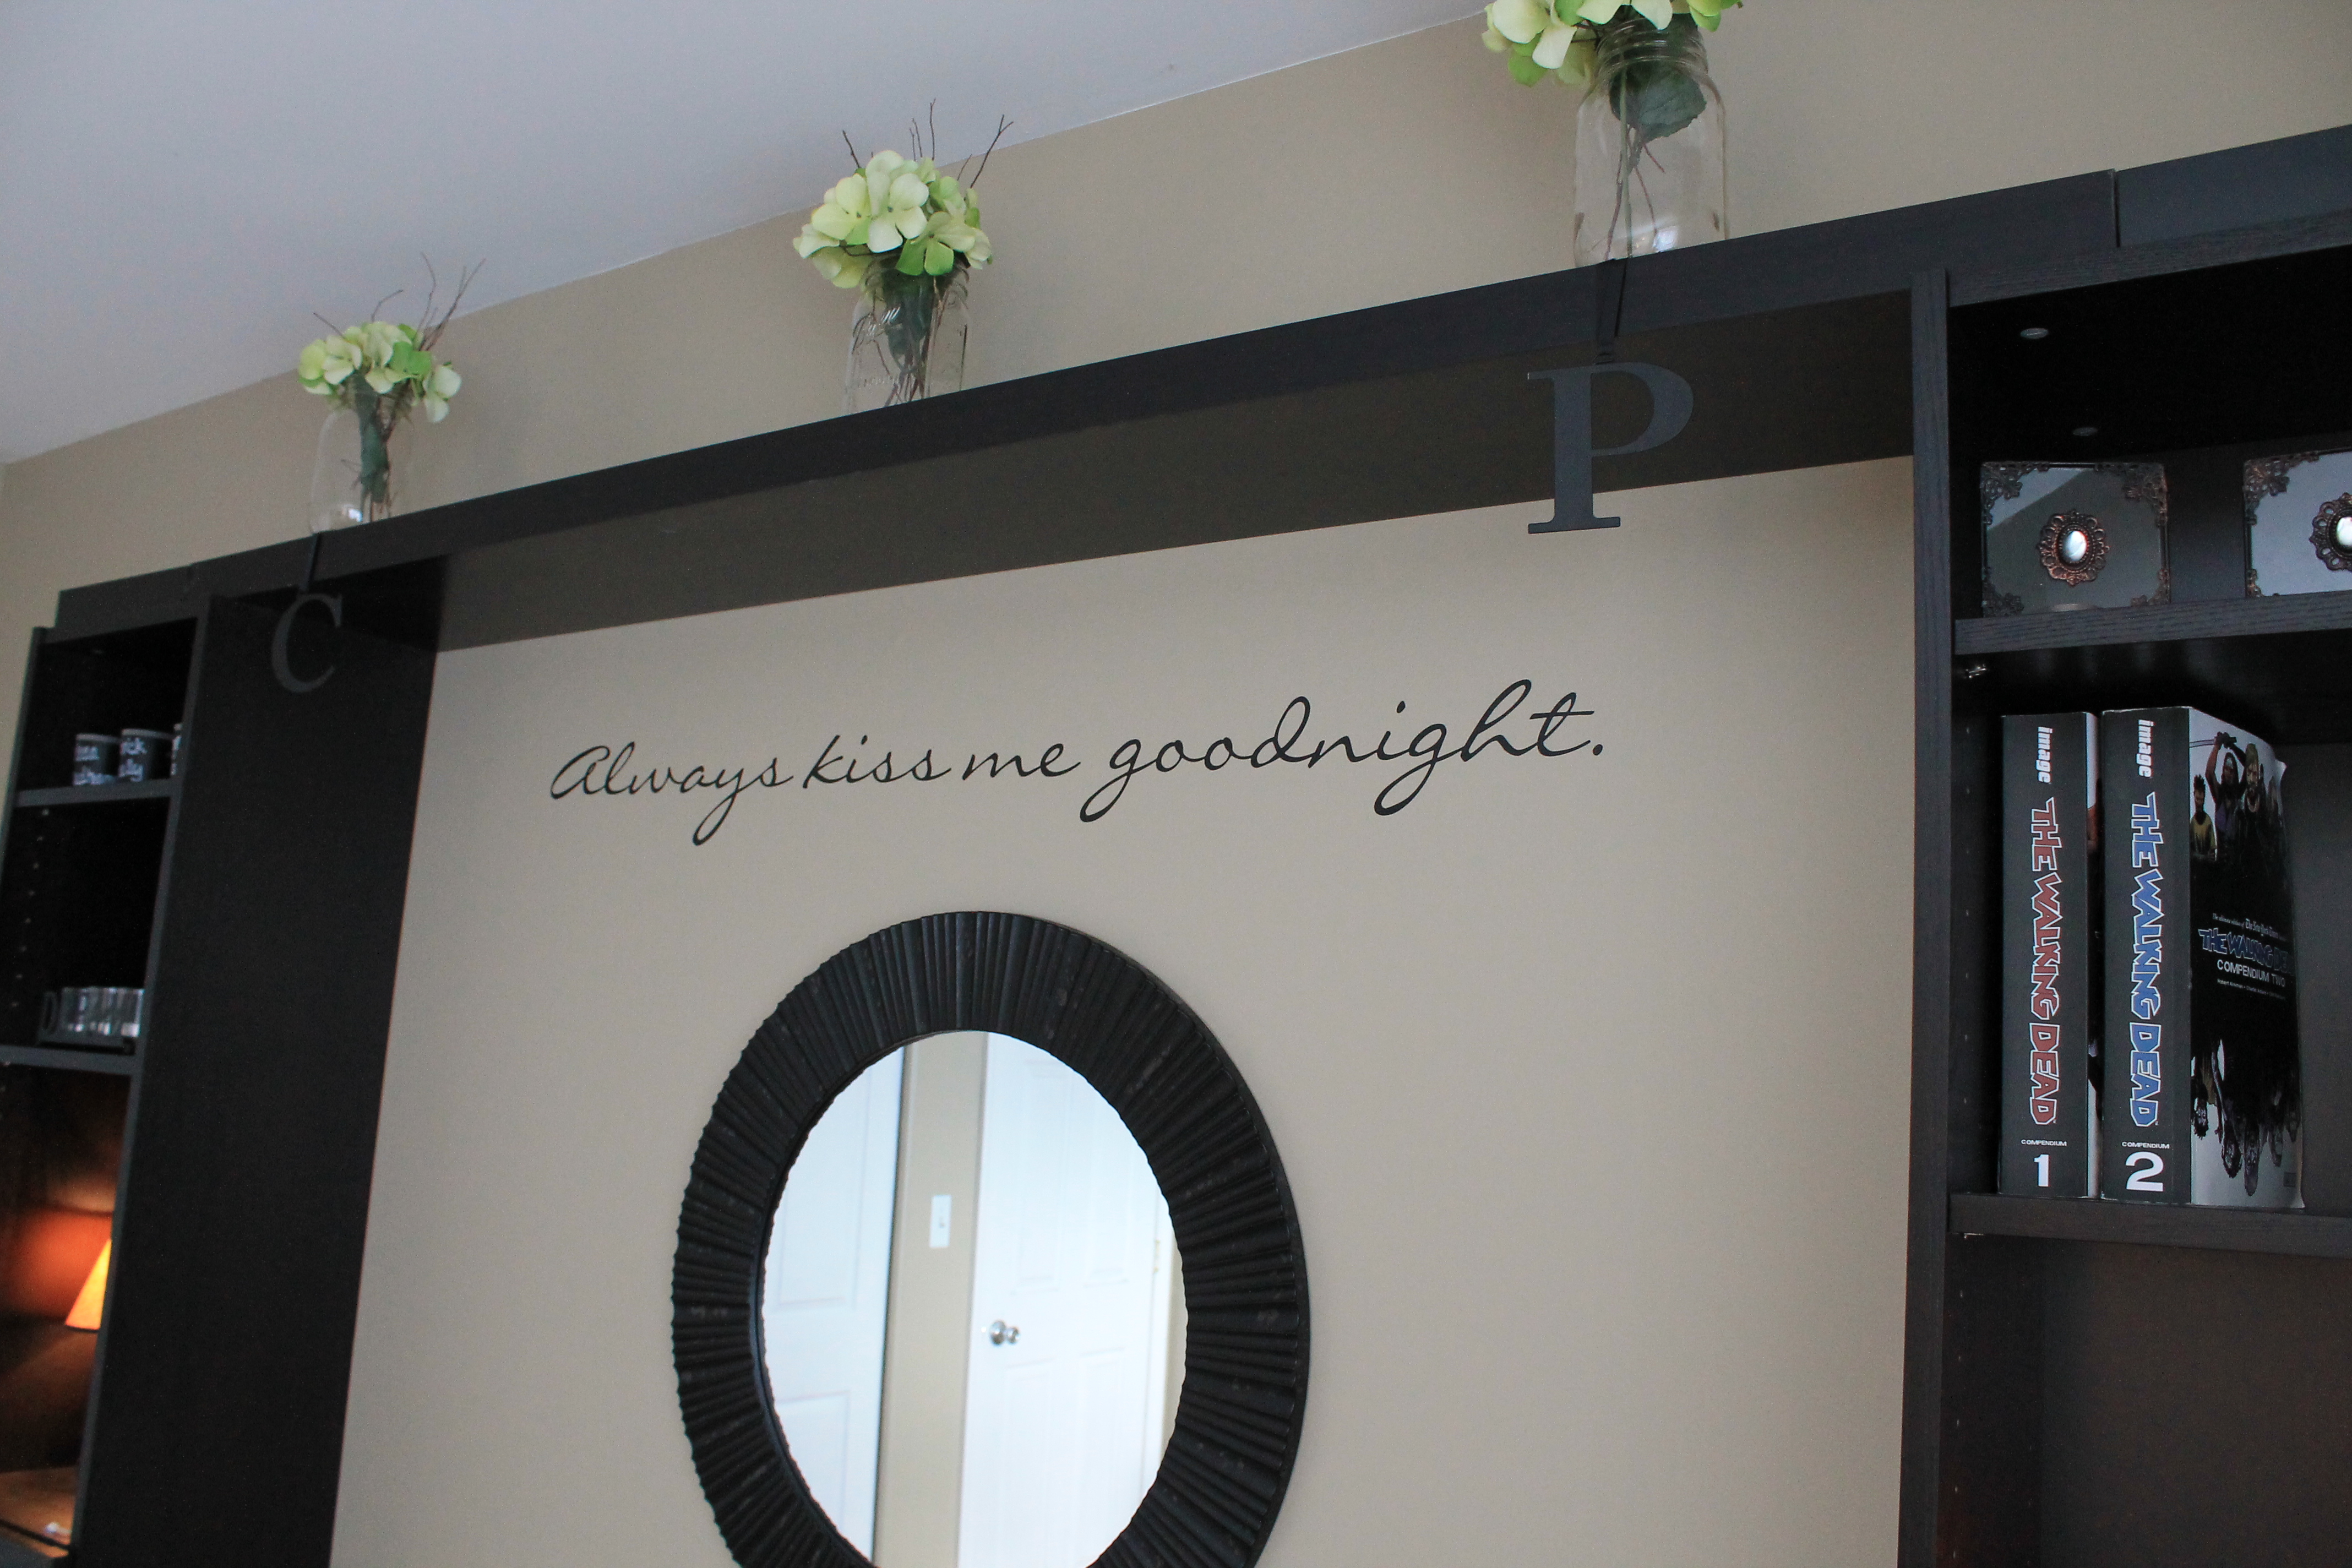
And seriously with the white. Why does EVERY craft room have to be white?? Did I miss the memo? Not only is white furniture a pain in the ass to come by, it’s incapable of staying true to color in the presence of my toddler. #TrueStory. Talk about a blank canvas, my daughter would eagerly color the shit out of a white desk. It looks like paper . . . I can’t even be mad. Oh and white walls? #DontEvenGoThere. I can’t handle it. Needless to say, I decided on black espresso, as I do everything in our house. While I enjoy the calming effects of lighter colors, I also appreciate the resale value in our home, thus leading me to a uniform design and flow through out our house. . . espresso everything. It started small and has now resulted in a domino like effect through the entire place. . . every room. It just works.

So to start, this project came about when I stumbled across one hell of a good deal on Craigslist. Once my wedding was over, the spare room sat empty. With the initial intent of creating another guest room, I quickly switched gears towards a more productive space once I spotted this posting. $100 for 4 (gently used) Ikea “cube” shelves. I’m pretty sure they are called Expedit Shelves at the actual Ikea store, but since our entire house is filled with “cube” shelves from Target, Ikea and probably Walmart; I continue to just refer to them as cubes. Ok, so this couple was moving to Atlanta and couldn’t fathom moving such a boat-load of shelving, thus- I score. #BigTime. One 8 Unit “cube” shelf is $89.99 alone at Ikea. PLUS it’s over an hour drive to Ikea. Ferndale is maybe 20 minutes. With that being said, I purchased them all. 2- 8 unit shelves and 2- 4 unit shelves. That would typically run a person $279.96 plus tax. I scored them for $85- (Talked the husband down over the phone.) #GoMe. They seriously are brand new with the exception of a few minor scratches that are on the floor end only. I couldn’t be happier. I get home and rearrange them alongside a few dressers we already owned with my hubby. Below was the layout we came up with.

Craft Room 2.jpg

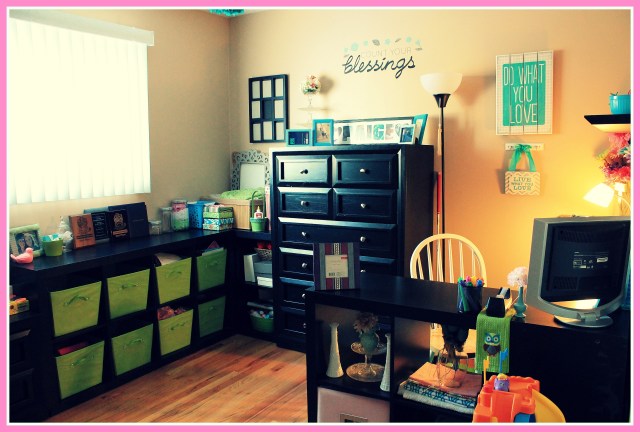
Ok so this is when things start to get exciting (If you’re not excited yet, stop reading. . . seriously, we can’t be friends). I have the space and the furniture, now it’s up to me to fill in the blanks! That is right, a blank canvas left all to my devices. Lets get decorating. . .  dollar store time is upon us people! #IFingLoveDollarTree.

Craft Room 6

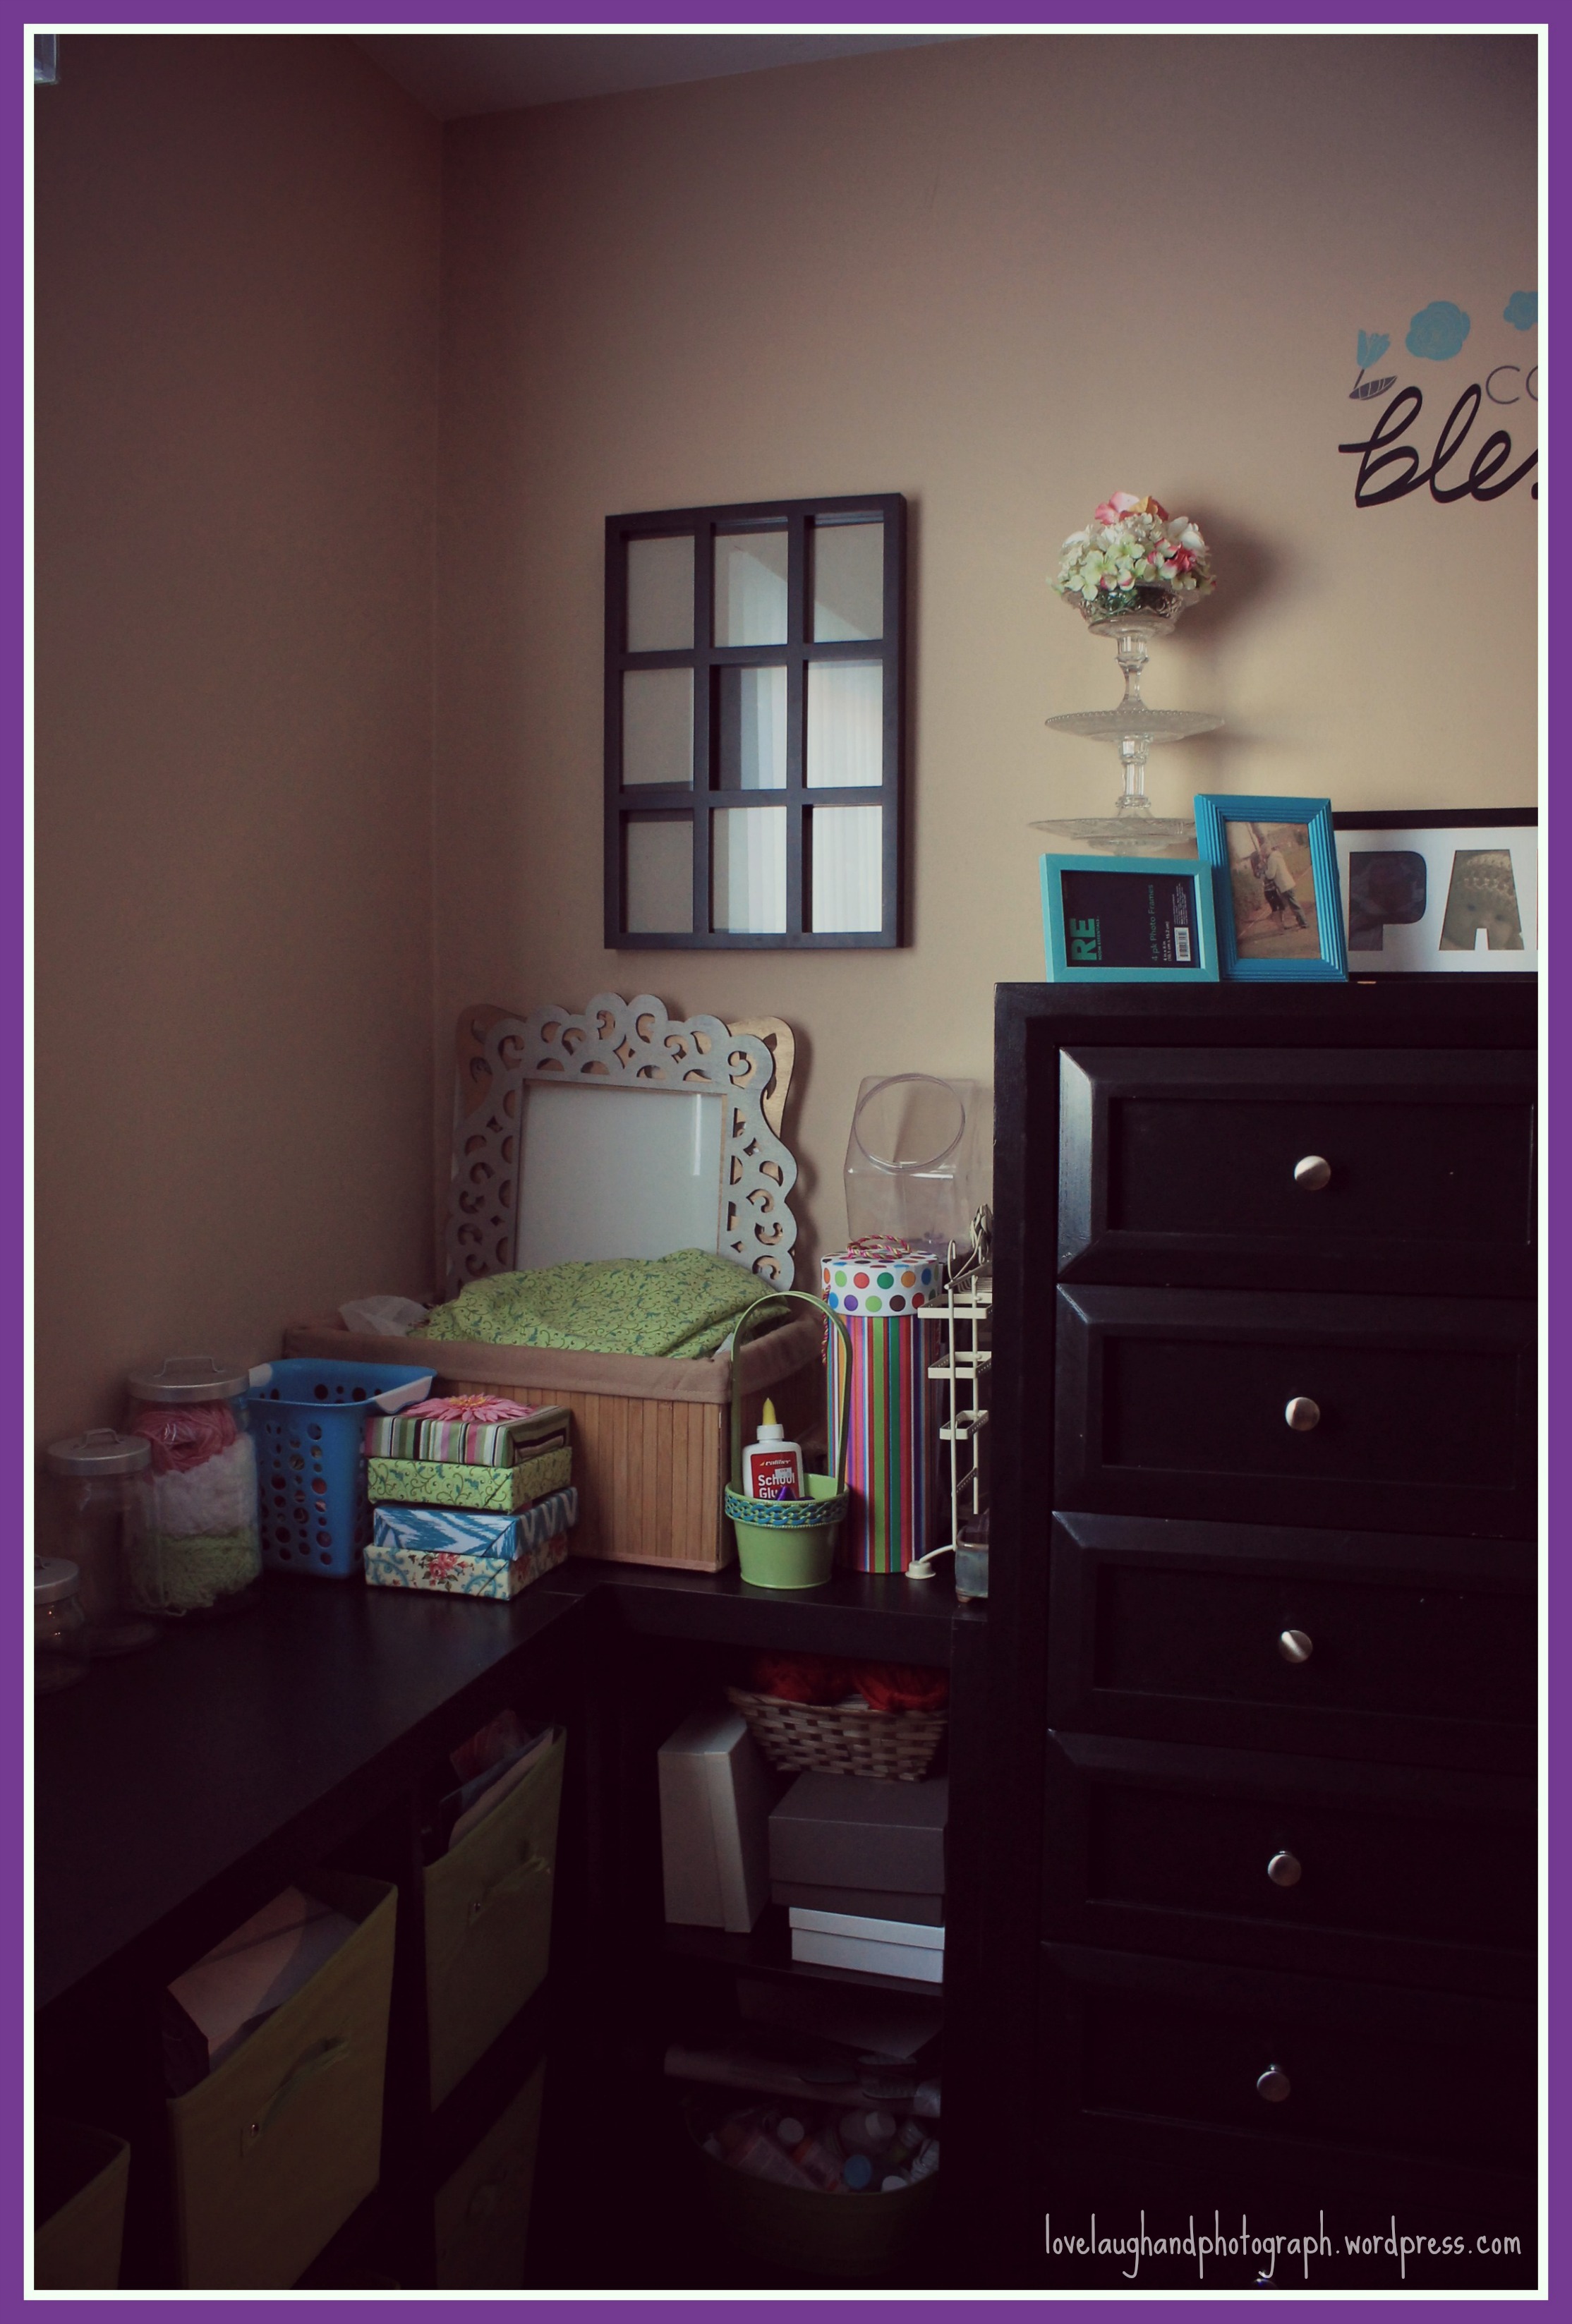
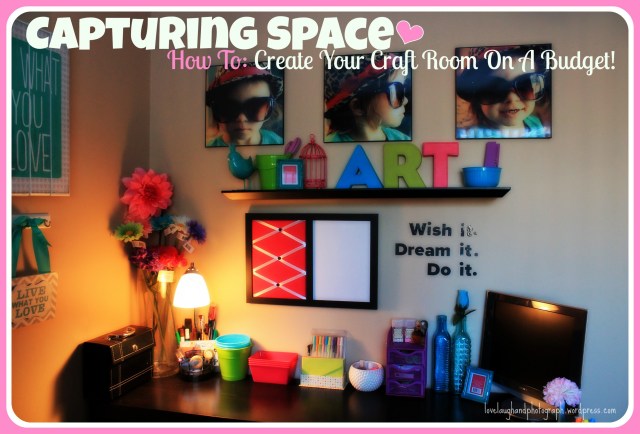
Ok so first lets start with this little shelving unit. The shelf was something we had lying around already, probably from Ikea as well. You can pick one up for like $15 or less. Anyhow, I decided it would be best suited above the desk end of my random layout and could be used as a decorative focal point. I decided that by picking up a few randoms to throw atop this little beauty I could really get a great vibe going. First was the random ceramic blue bird (adorned with inappropriate and slightly humorous crown): Picked him up at HobbyLobby for $1.50. His beak was chipped- normally $15.99. The Pink Bird Cage you see: $3.50 – Also from Hobby Lobby. Normally $7.00 but was marked 50% off the day I was shopping. Blue frame: Free – I’ll explain further down in the post. The blue bowl and Green mini bucket: $.25 – DollarTree. Picked them up a few birthdays back for candy dishes. 4 for $1. The Purple Clothes Pin: $1.00 in the Michael’s Craft Store $1 Bins. The A-R-T Letters – leather wrapped – $1.00 each – Also in the Michael’s Craft Store $1 Bins. I’m telling you people, THIS is where it’s at. I can’t stop at any craft store without checking out the clearance sections, $1.00 bins or markdowns. It’s always a gold mine!

Craft Room 3

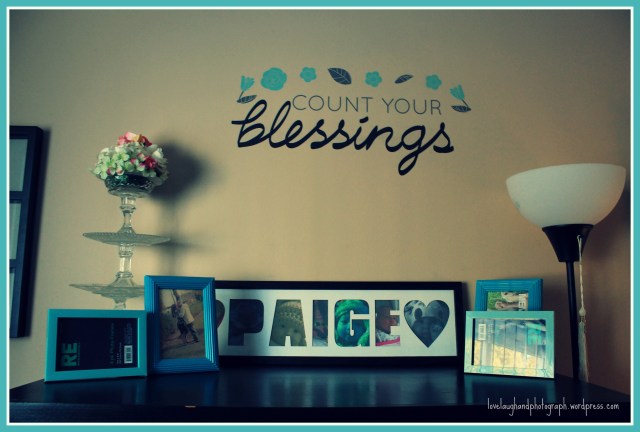
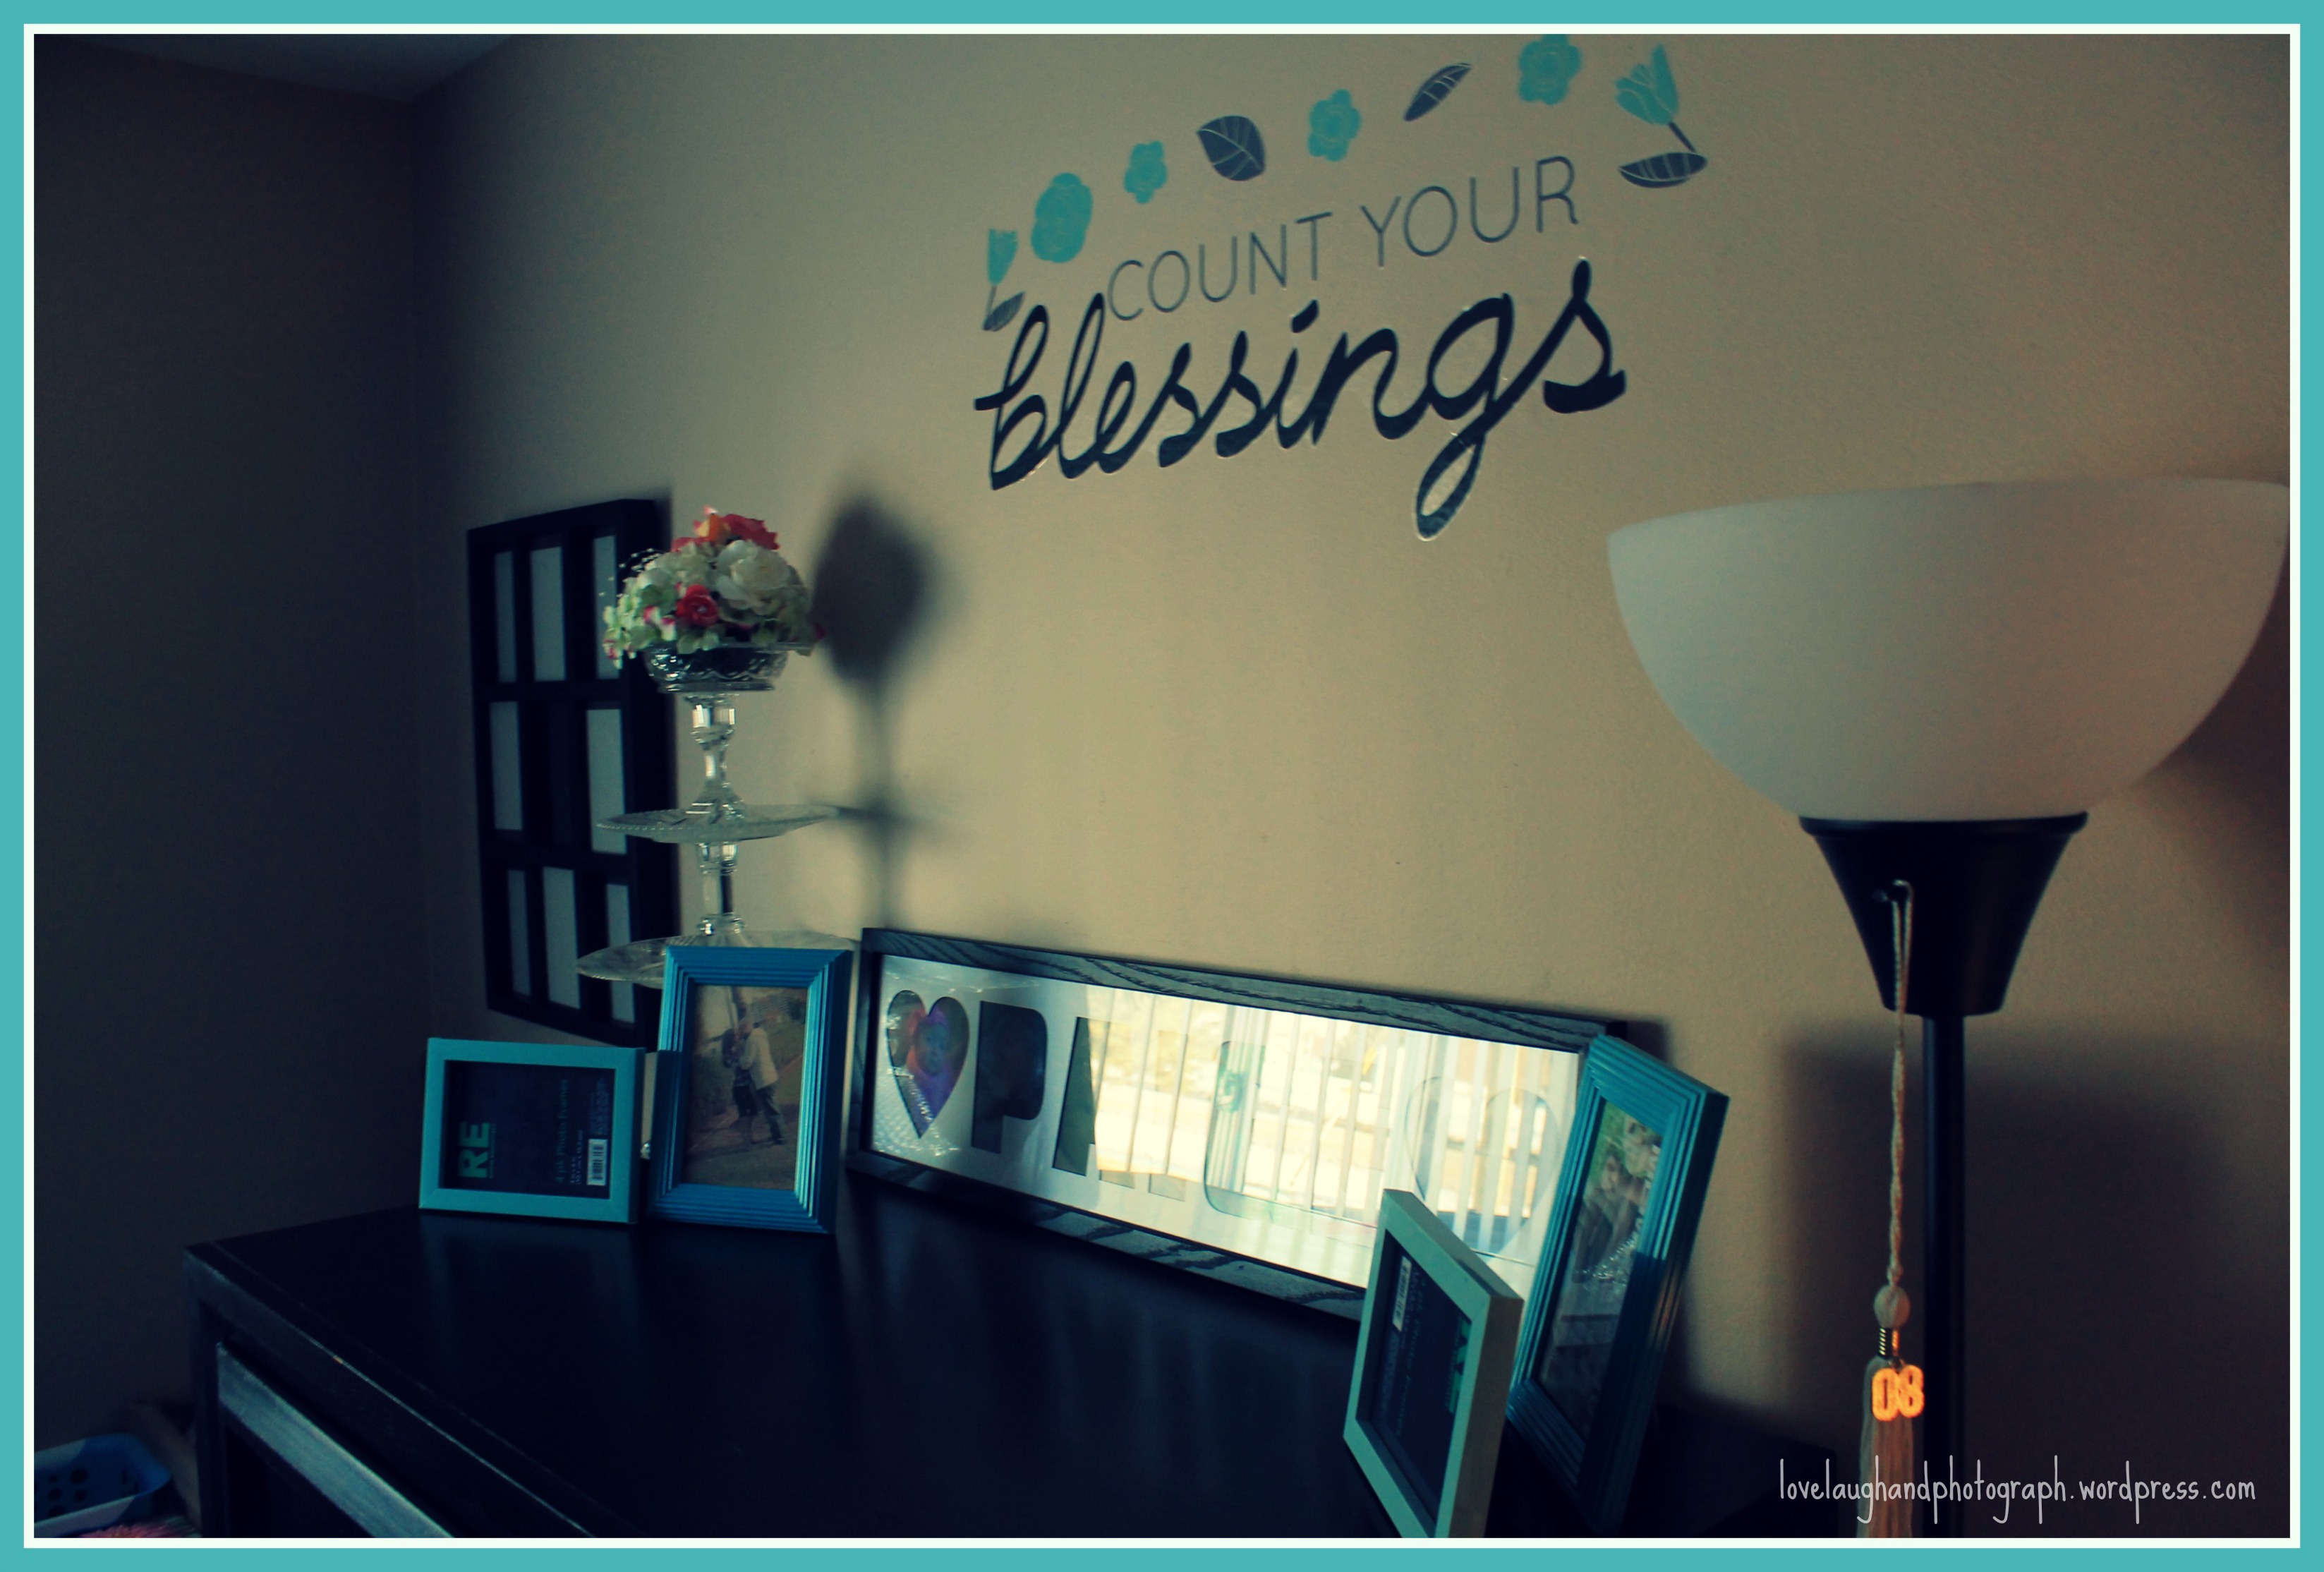
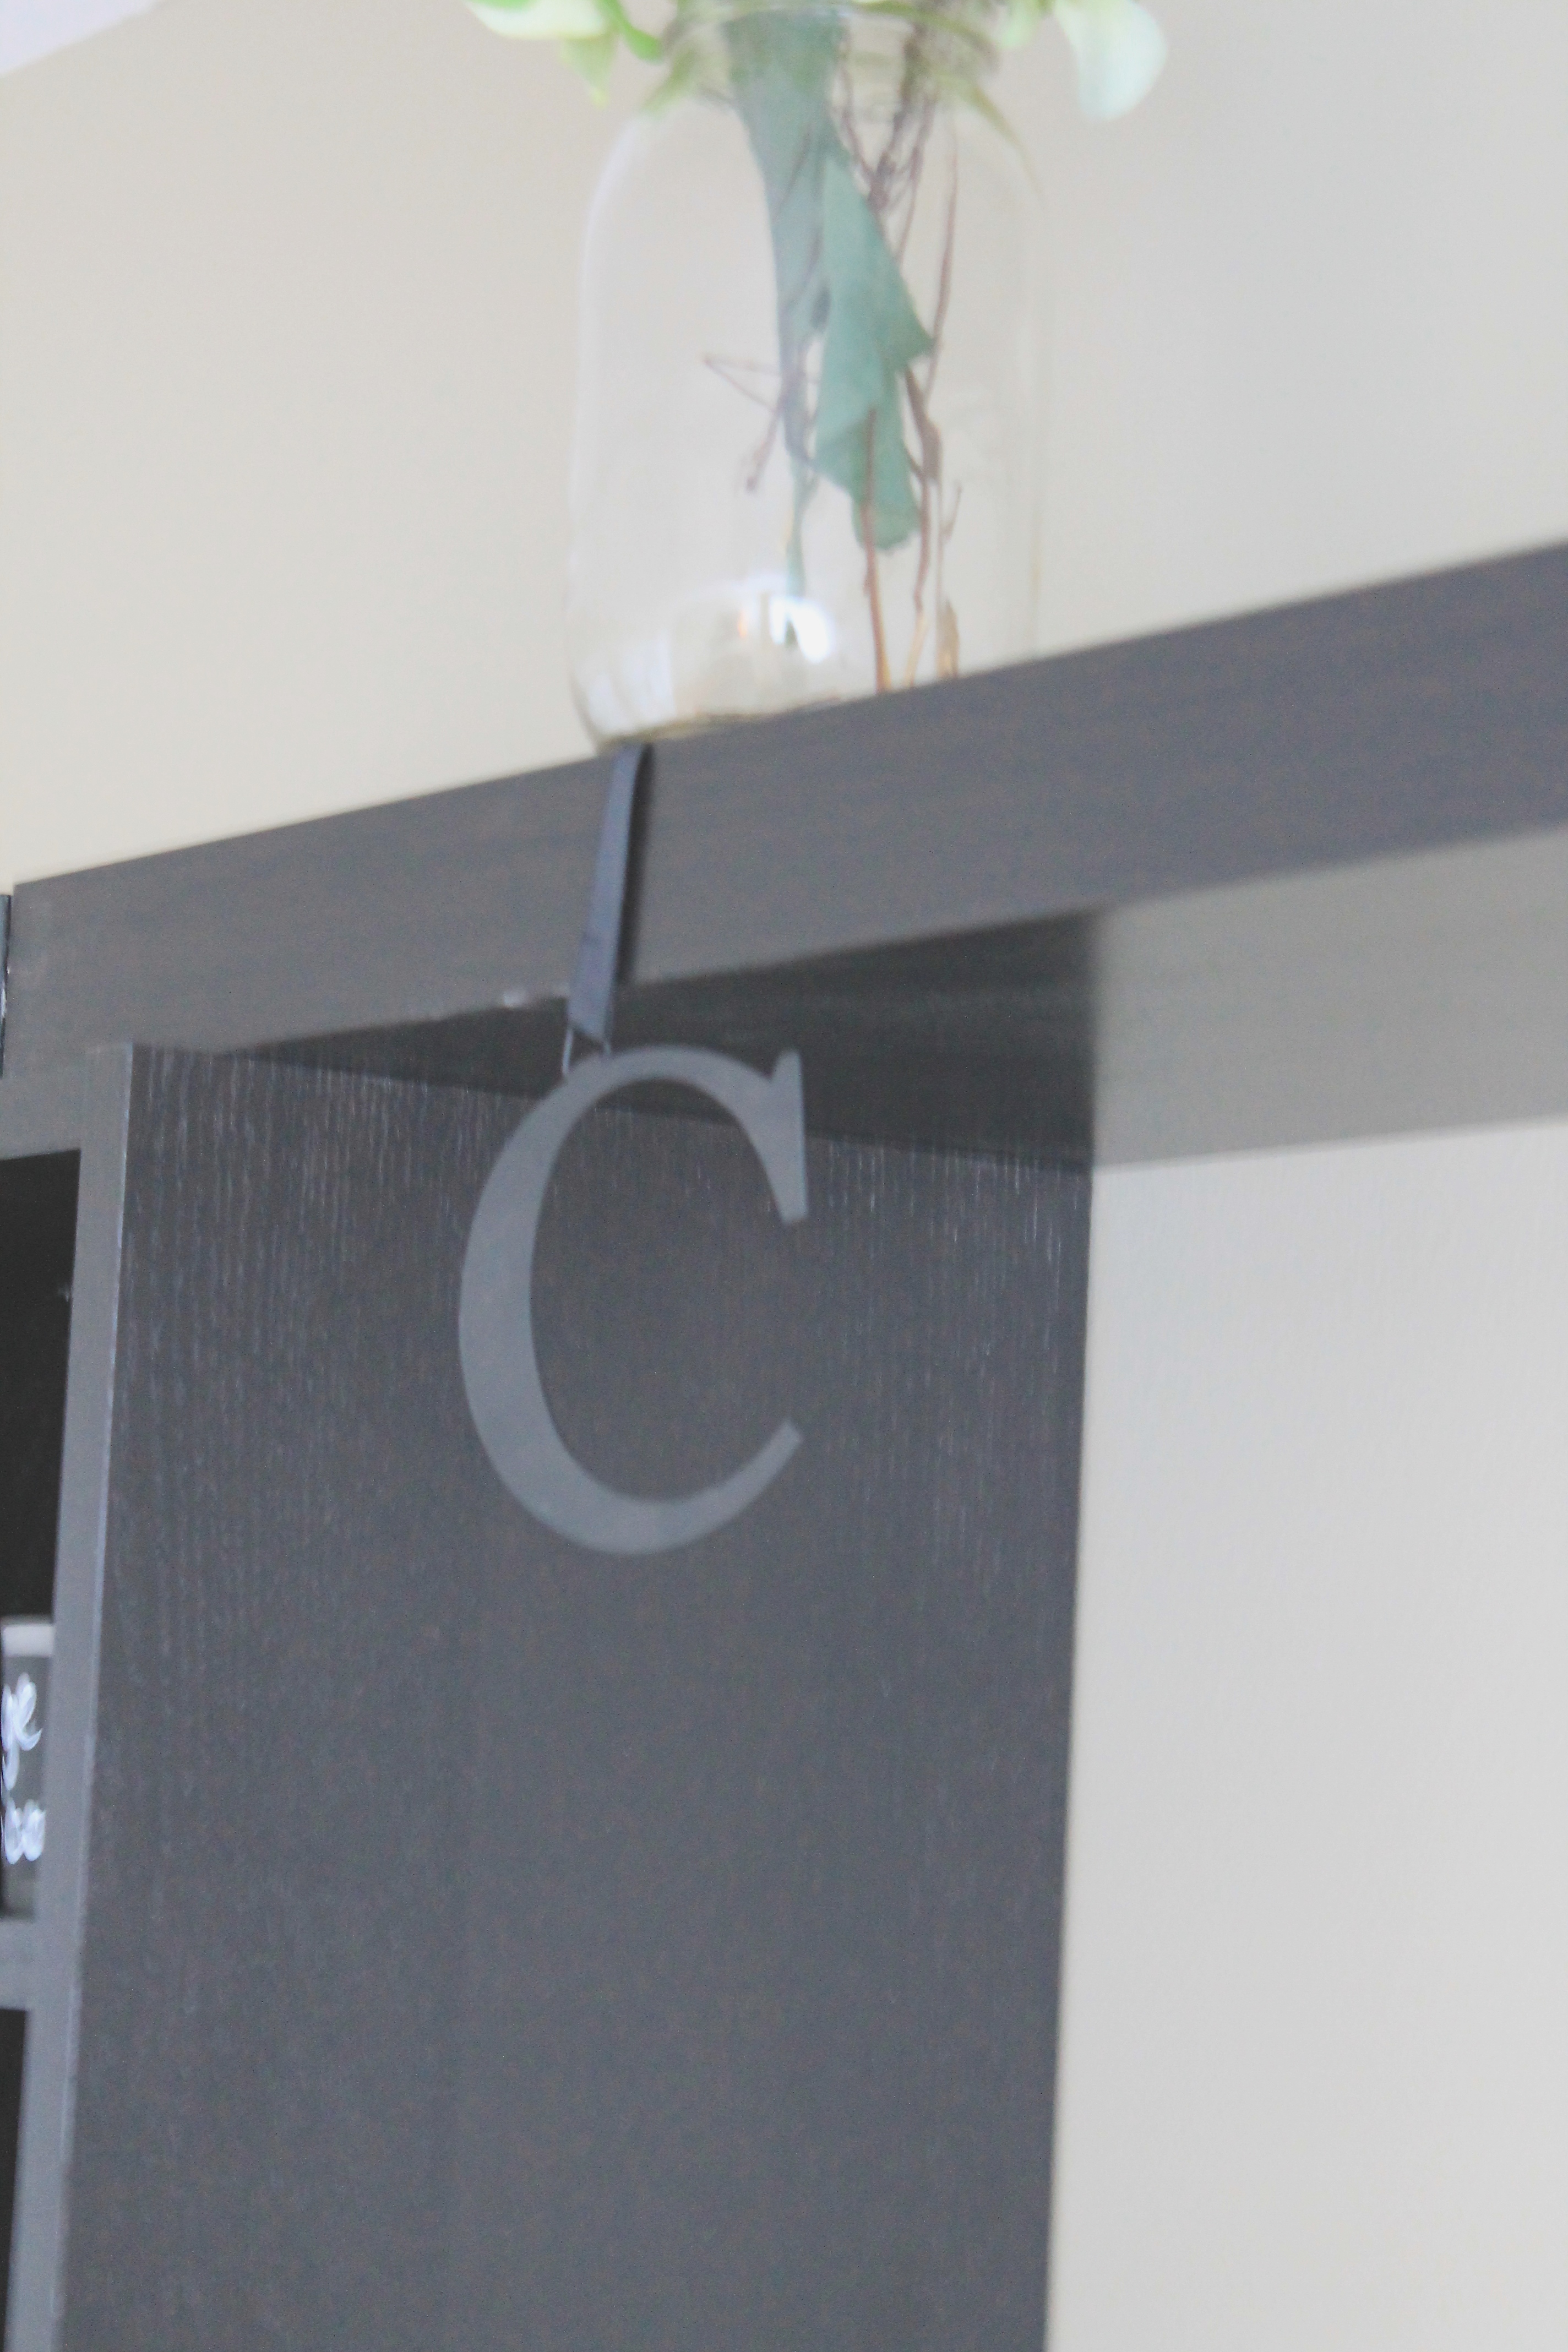
Next comes the top of the bookshelf. I decided to spruce this up with a few things I already had lying around. It was ok at first but was lacking that “grab factor”. I decided to pick up a wall decal at Jo-Anne Fabrics last weekend to finish it off. The Decal was only $9.99 normally – A great price. I got it for $6.36 with a 40% off Coupon. #Winning. The Paige frame was a gift I got from my husband a year or so back and fit the bill so it stays. The blue frames, well: I hosted a black-market trade with my sister-in-law. She gave me 9 aqua, mint and teal frames in exchange for one pair of moccasins. You think I’m joking? I’m not. I initially ordered them for myself, the 5 was too small (this typically NEVER happens). Alexa, being the only human on earth to wear a smaller shoe size than myself, was my logical recipient for a free pair of Mint Green Mocs. Something I was truly in love with. . . . Don’t worry. I still ordered myself another pair (they were on clearance + free shipping = DUH). She called and told me she had some un-used frames she was getting rid of and thought I might be interested, I told her I had some brand new Mocs that wouldn’t see the likes of my foot. . . we rendezvoused that night. BAM! Trade. (I guess I will consider the frames costing me $12.99- the total for these AEO Mocs). The chair – already owned. The “Live What You Love” sign was a random purchase at Hobby Lobby for 40% off at $6.50 and that awkward vintage desert tray in the back? $2 from a Craigslist spree back in 2012. . . Yes I’m crazy.

Craft Room 11

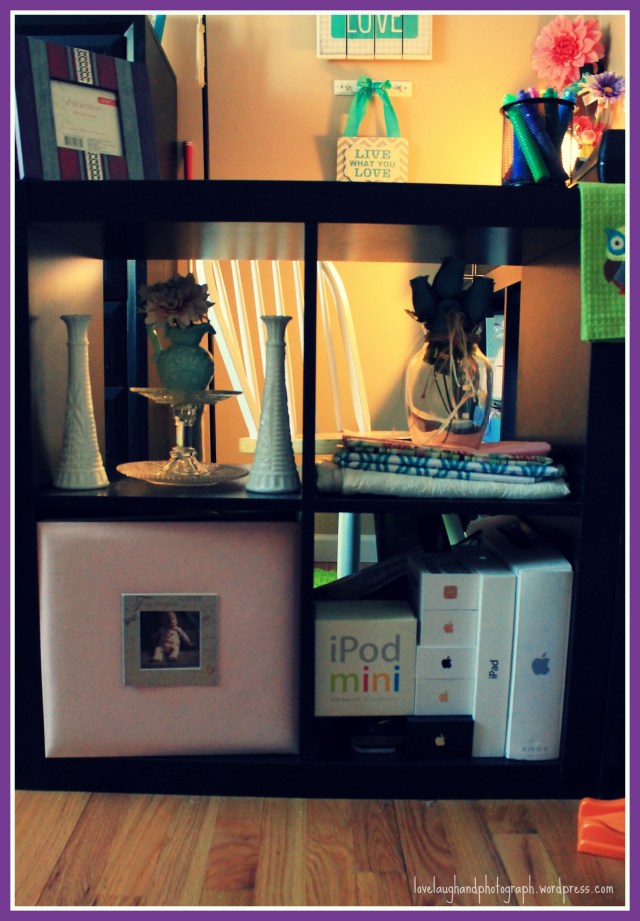
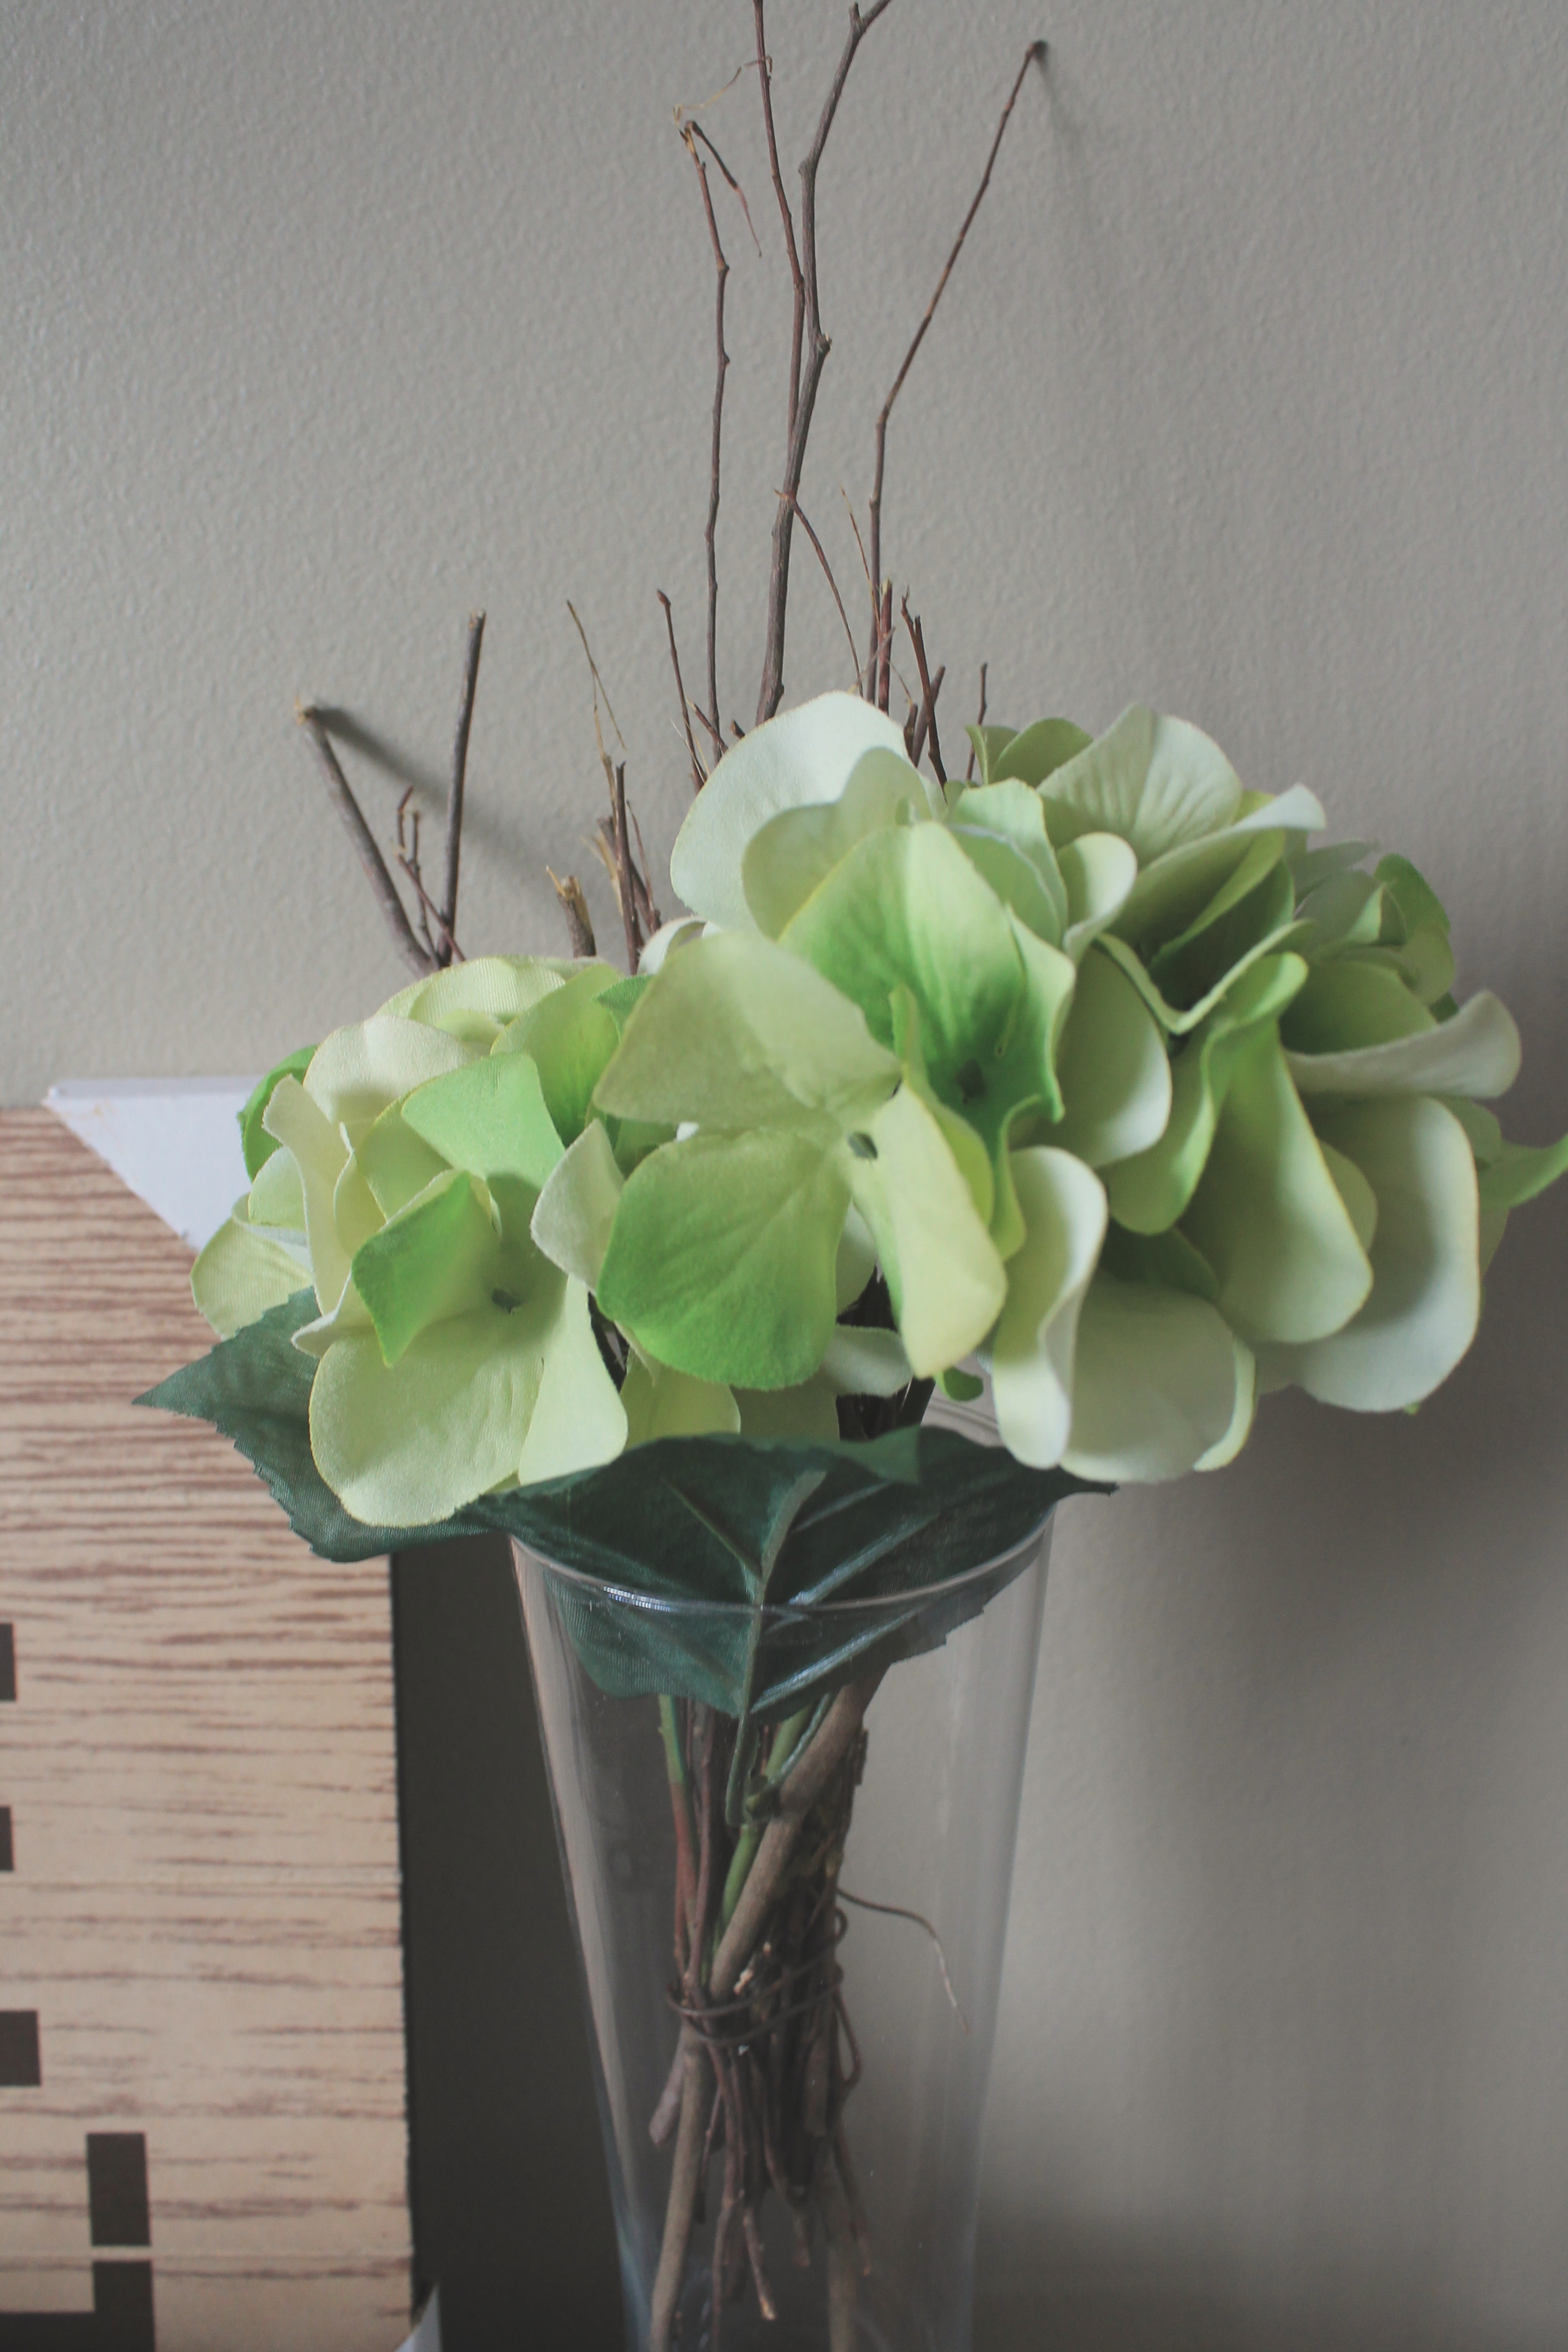
This little cubed in portion of my desk was another area I planned for appearance, not storage (although the apple obsession had to be stored somewhere- it’s a little of both). The bottom shelf was an excellent place to store all our old apple boxes, some needed-some not . . . but I seriously just love their packaging. The other side was a perfect fit for Paige’s first scrapbook. It’s basically an exact fit. Above are just fabric remnants, thrift store vases and some fake floral. All in all I would say totaling $8. It wasn’t much of a find as I just pick things up when I’m out and about . . . I figure out what to do with the stuff months down the road.

Craft Room 1

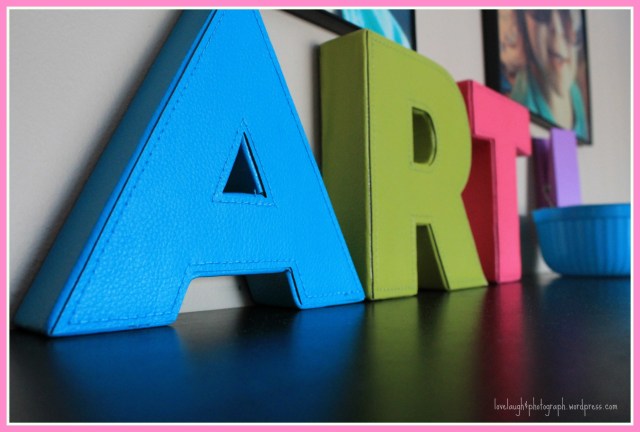
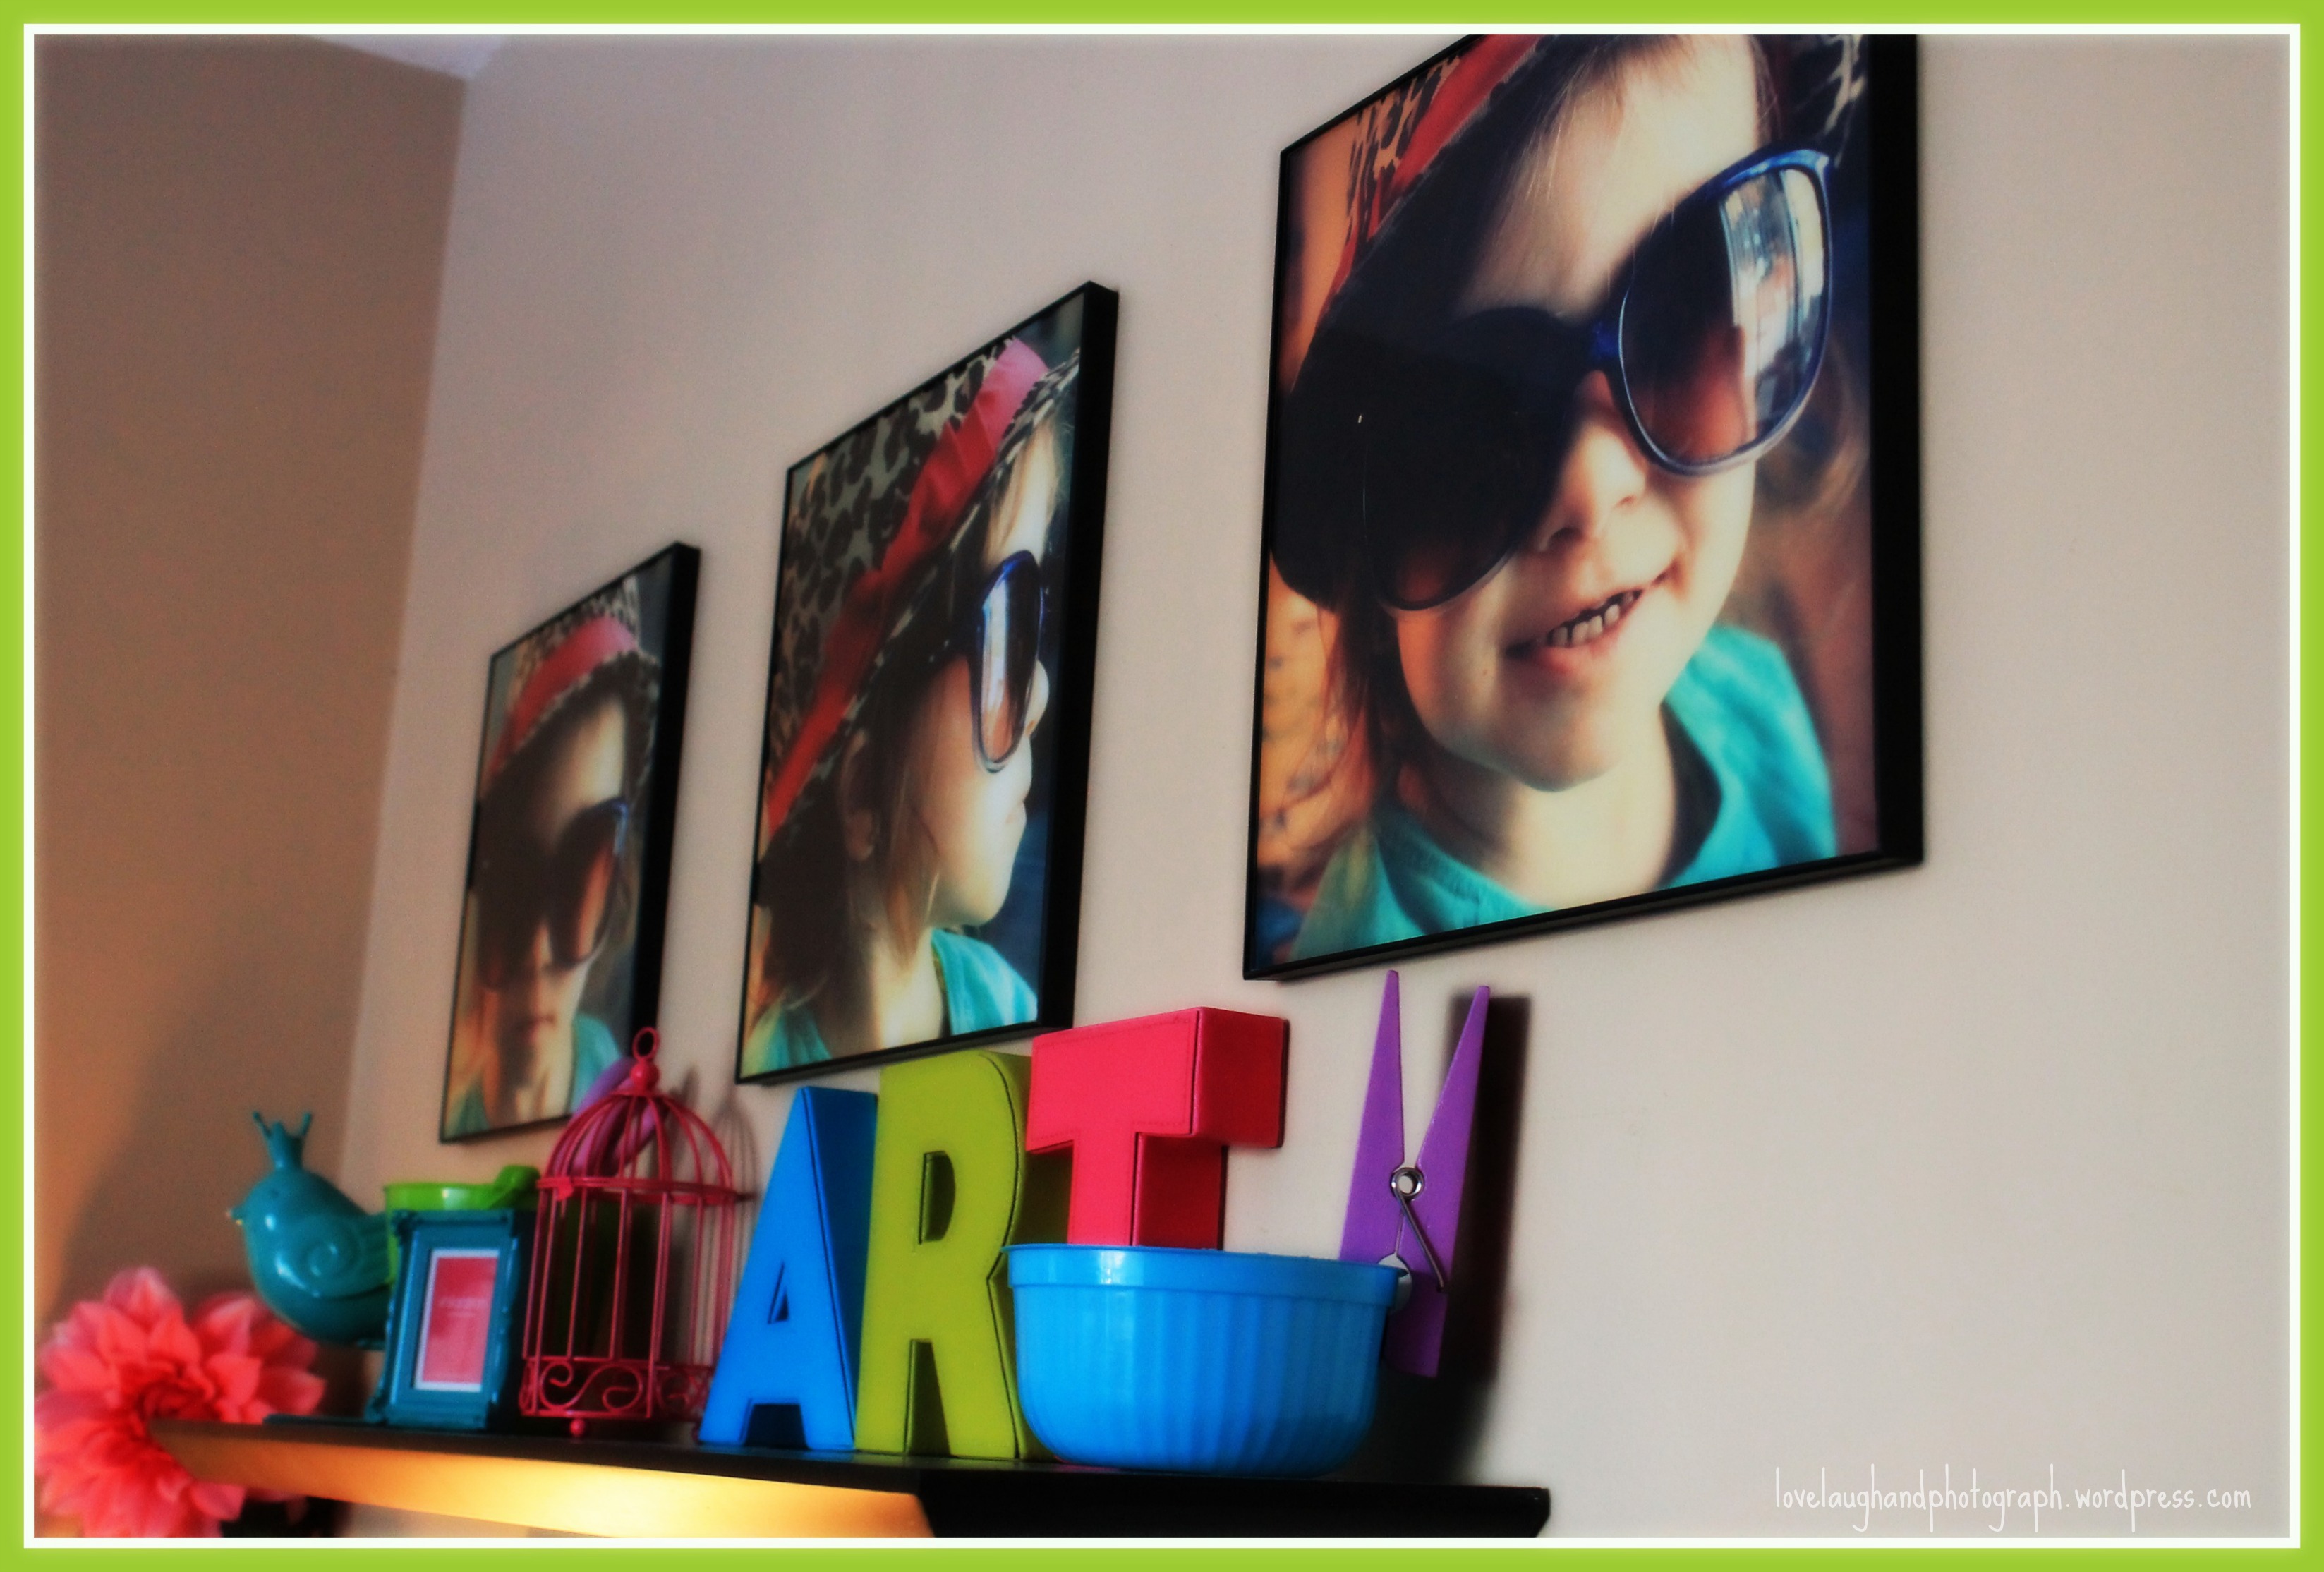
I seriously just LOVE these letters. Fun Fact – If you switch the A with the R it spells RAT (a nickname my husband often uses on Paige when she’s being a “brat”). . . the fact that these letters were placed directly below her photos is however, a total coincidence. #ThatsWhatWeTellOurselves.

Craft Room 4

This wall art was picked up at Hobby Lobby for $12.50. Originally $25.00, it was marked at 50% off- along with everything else made of wood in the store. I couldn’t help myself. . . . I Love The Sales!

Craft Room 7

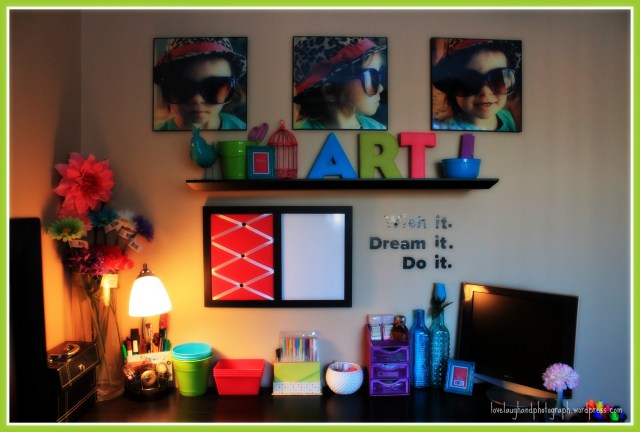
The desktop is probably my favorite part of the room. . . So much color, so many helpful storage ideas. It’s seriously just so FUN! On the left, I picked up a little file organizer probably 8 years ago while I was in college and never put it to use. It’s black, files away all my Etsy receipts. It’s pretty much a NEED now. I remember picking it up on clearance for like $6.00. The large vase/hurricane glass in the corner was a wedding shower gift that cost us nothing and the flowers inside were all different clearance finds (and no I haven’t removed the tags yet). I think all in all probably $12.00 in the vase. The lamp I found at Meijer a few months ago for $15.00 and it even holds an iPad and has a USB dock. Love that lamp. The dry-erase board was a clearance find at Target last week for $6.95 and the stationary was a gift many years ago. The green, blue and pink containers were all from Dollar Tree – 2 for $1.00 and the golf ball bowl was a purchased a few years back for Paige’s Golf party on Amazon. $8.99 plus shipping. The purple desktop storage you see was a clearance find at Office Max last month for $7.00 and the blue vases and frame were additional trades with my sister-in-law. I also picked up the fun “Wish it. Dream it. Do it” decal at Dollar Tree for $1.00. I seriously just love love love this desk, I can’t wait to finish this never-ending post at it tonight!

Craft Room 10

*Fun Floral To Add A Little Color – Each Daisy was on sale for $.99 at Michael’s yesterday. . . I just had to have them.

Craft Room 9

So if you’re wondering, yes you’re seeing a lot of empty frames. The one thing I’ve yet to do is print our photos, prints and quotes for all these wonderful frames I’ve come to own. #OneStepAtATime!

Craft Room 5

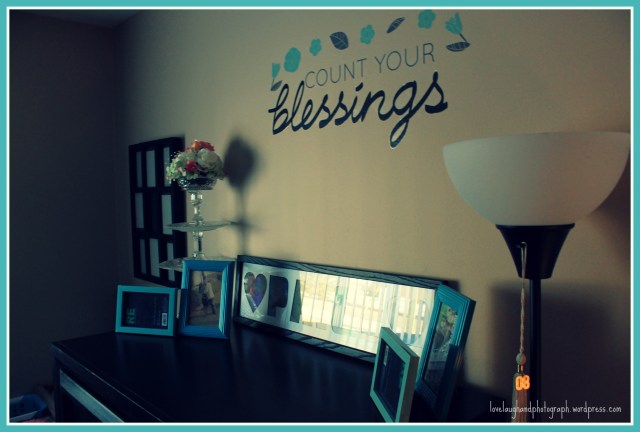
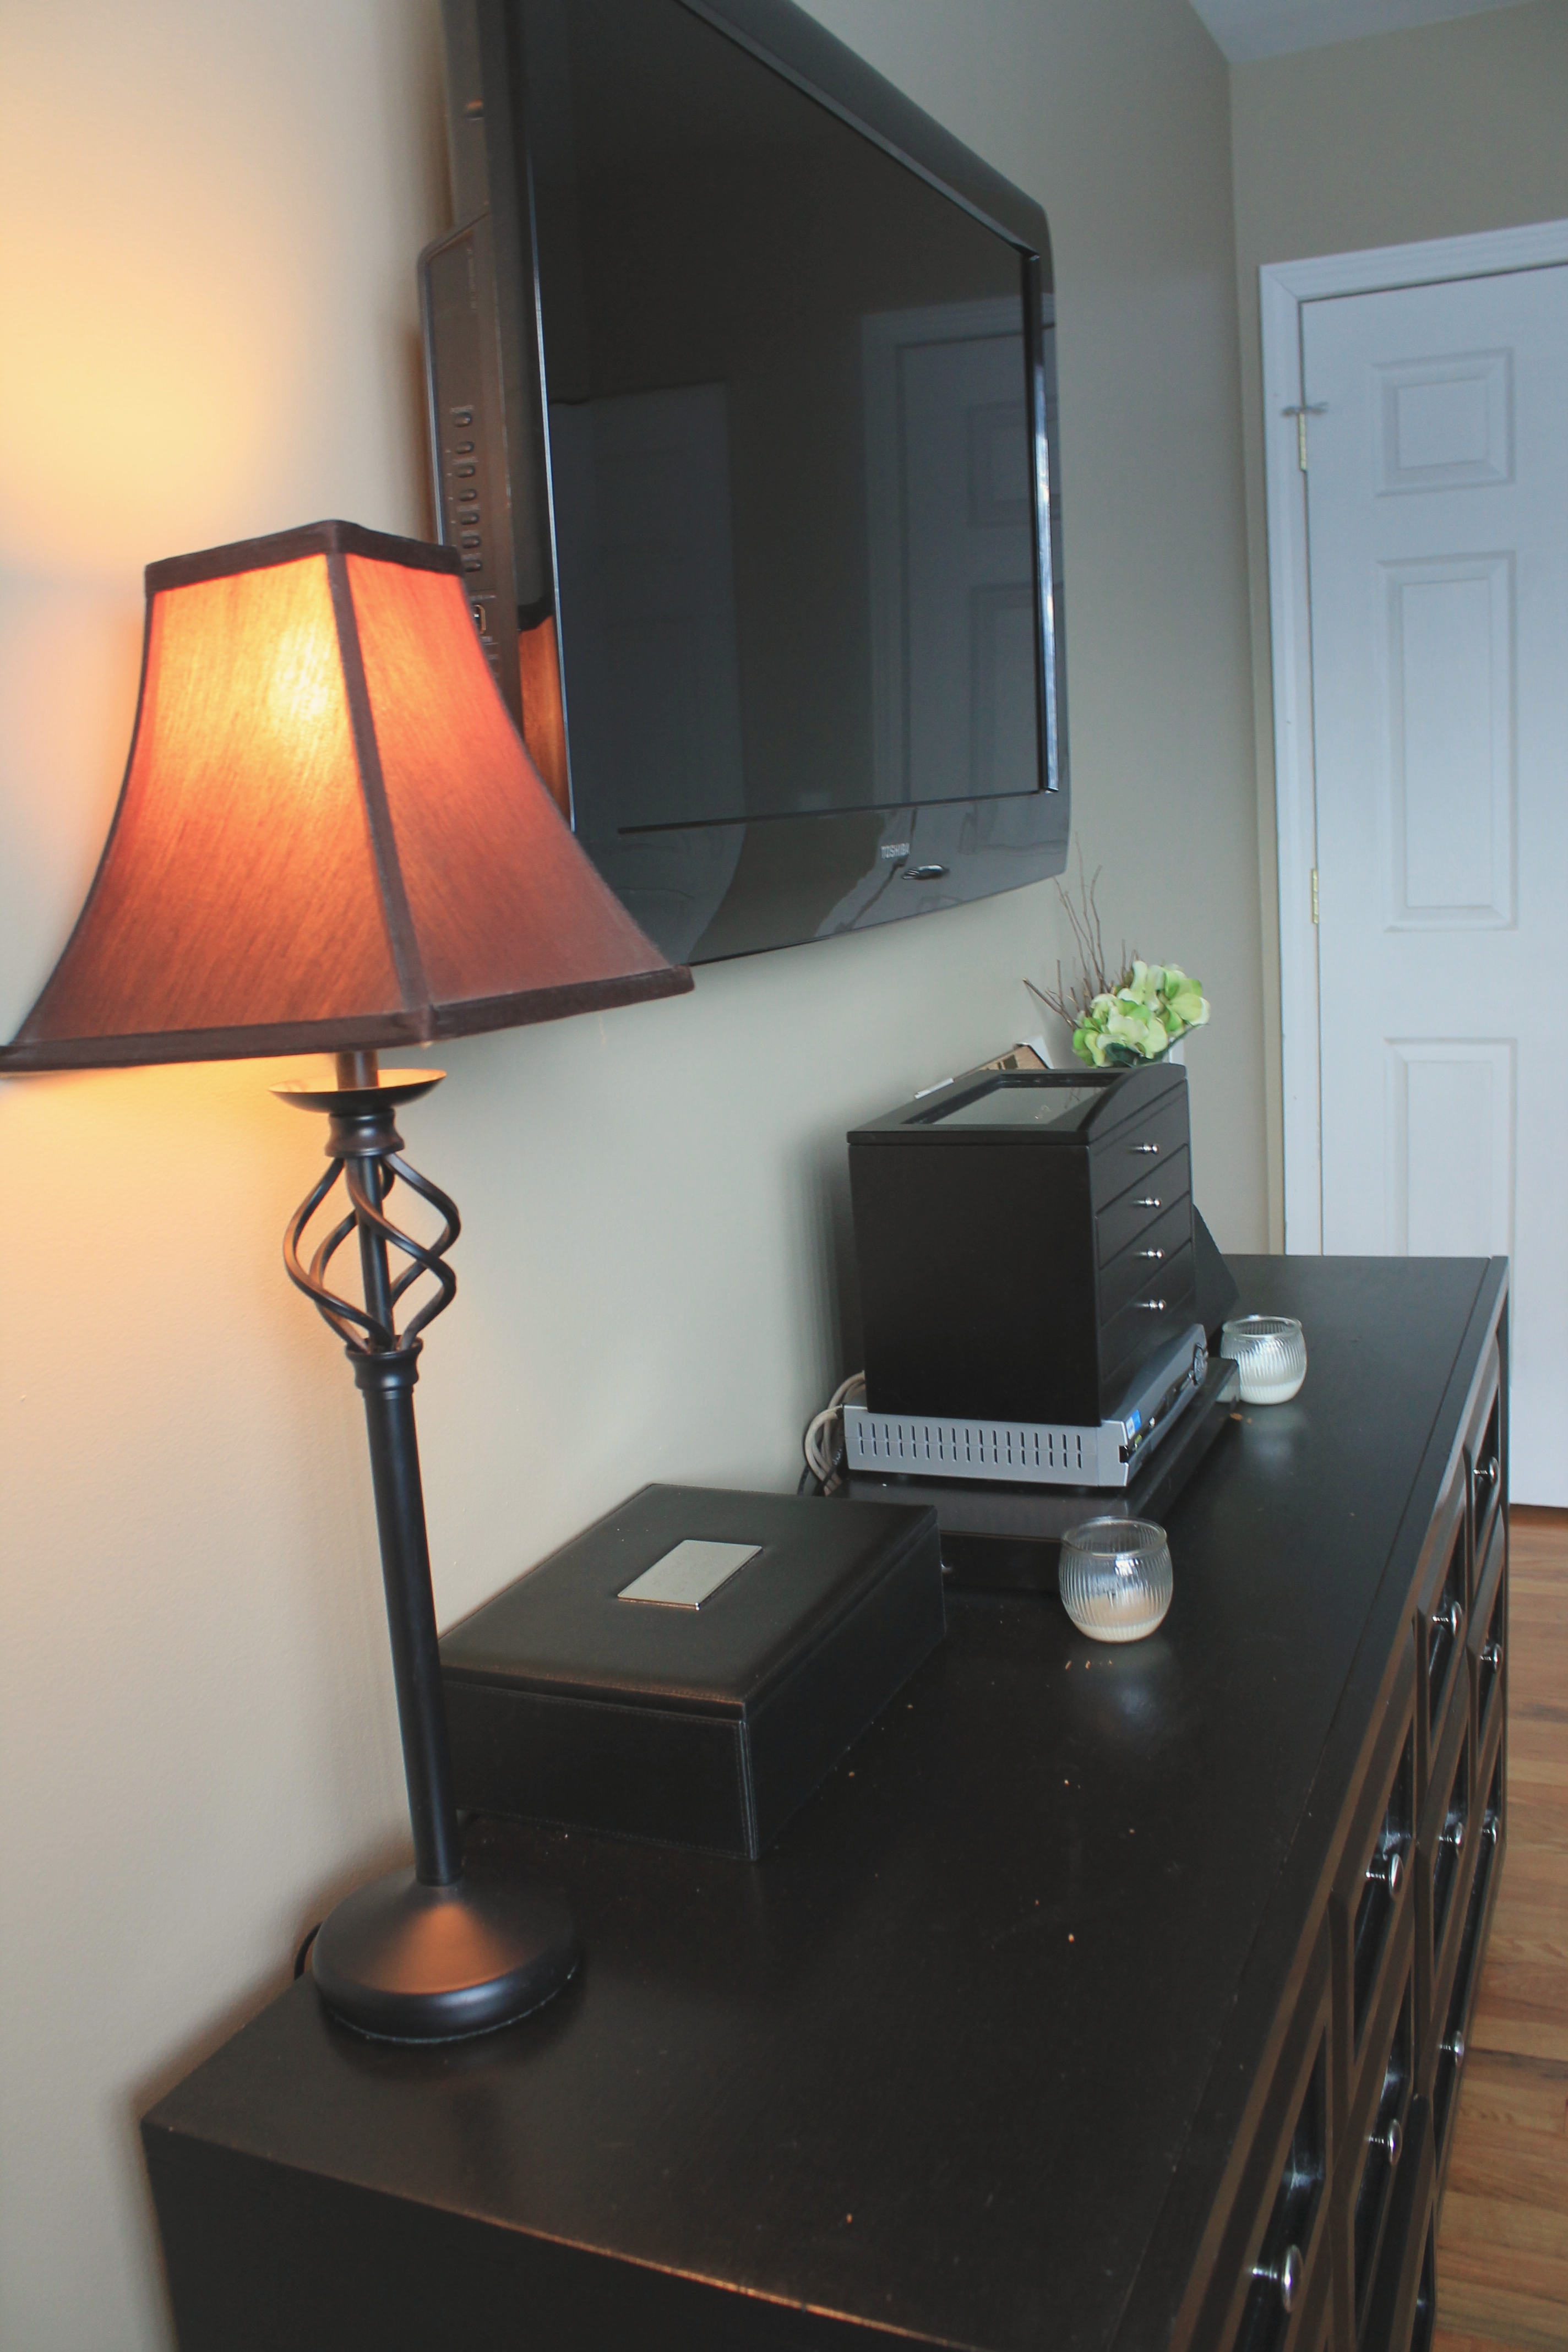
More empty frames. . . .I also even managed to sneak my College Graduation Tassel on to the floor lamp I picked up at Meijer last month. . . a quick $17.00 buy. The black frame across the wall is also something I had purchased back in the day, but I’m pretty sure it was a BigLots purchase of $15 or less.

Craft Room 12

Finally getting around to the storage, I picked up all the green canvas bins you see at my local Meijer. After a TON of research, measuring, indecisiveness and immense frustration; I finally settled on these obnoxious bright green bins. A close-to-perfect fit, these canvas cubes can store all my crafting gear while also tying into the colorful theme. They were initially $12.99 a piece but I snatched 8 of them up for a quick $6.95 per cube – Last 8 in the store! Other storage was found at Dollar Tree – per usual. I also picked up the fun frames at Michael’s for $1 a piece – Great photo booth props, and the wooden basket was a Christmas Tree Shop find for $7.00 at christmas. It’s perfect for storing all my extra fabric strips!

Craft Room 6

Finally, my absolute FAVORITE part of Chelsea’s Lair. . . . the Paige Art! Something I added just moments before finishing up: Photographed some random pictures of my daughter, printed 3 12×12 photos for $2.99 each at Costco and found frames at 65% off for only $2.83 at Jo Ann Fabrics on Sunday! These were the perfect addition to the space and added that artsy, yet personal look I so enjoy.

So all in all this room cost me around $300!! Totally worth it! I can’t wait to put it to good use and I hope to spend many an afternoon enjoying the organized chaos that is my life!

Have any of you created a home office? I would LOVE to hear about it! Also, check out the crazy link-ups over at the 36th avenue for great ideas on DIY EVERYTHING!


Whew, that was a long one. Happy Monday!

Cheers,

– C

Back To Basics: Updating The Bedroom! *

So I should probably start off by apologizing. I know I said Wednesday that I would be posting this topic (Thursday) yesterday, and I didn’t. In fact, I attempted to make it one, straight week posting every day and I failed miserably! Oh, and on the one day of the week I work remotely no less. . . It should be the easiest of all the days, unless you of course wake up (as if you really slept to begin with) to a sick baby, a house full of chores and 5 Etsy orders to get out. It’s just been one of those weeks and basically, no time. Paige kept us up all night and I soon realized that she had a killer ear infection, thus requiring me to set a doctors appointment and cancel all pending errands (and said post). We made the best of it and she’s now feeling much better, but I wont lie when I say that I felt a little disappointed in myself for not finding the time. 

But really? Nobody cares if I post photos of my stupid bedroom updates one day later. Nobody is going to lose any sleep over this, especially me (Because it’s a post about a bedroom). On that note, lets roll because I finally fucking LOVE our bedroom and can’t wait to share the results!

Bedroom Update

So when I met my husband years ago, he had already purchased his house. A very responsible purchase for such a care-free 20 something, he was very much a dedicated home owner and it’s where we still live today. While I’m happily adjusted to his humble abode, I have made quite a few changes since my initial introduction of his territory. #AGirlsGottaDoWhatAGirlsGottaDo. While most men suffer from some sort of internal dysfunction as it relates to all things “pretty”, PJ and I actually agree on a lot of decorative compositions and we both seriously love a project! We have similar styles and it creates a very comfortable and collaborative connection when redesigning anything in our home. While he may not completely adore my impulsive “decorative” purchases, he does find joy in the final results. . . .whether or not he deems me crazy in the process.

While we are now married and the house is legally “ours”, I will always consider it to be HIS home- for lots of reasons: I didn’t help purchase it, didn’t get to house hunt (the best part), didn’t decide on location, didn’t select the paint palette and definitely did NOT orchestrate the landscaping.  While it’s an absolutely wonderful house and I truly enjoying calling this home, their will always be little things I try to transform in every attempt to call my own. From hanging art to complete revamps, I always have a project in mind and with no future moves in sight, it’s D.I.Y. from now until the day we decide on our next home together!

Za and Dad Painting

With that I bring you to our master bedroom. The last remaining “blue” room in the house, PJ had been clinging to his boyish walls since the day I moved in. Forever avoiding my “womanly touch” this little bastard would come up with reason after reason why we shouldn’t re-paint the bedroom. . . . or the office. When Paige was conceived and finally deemed a female, her and I together declared the office (soon to be nursery) blue be banished – And yes her vote counted before birth. The bedroom was another story. Finally, 4 years later I’ve successfully removed all blue walls from our home. #Chelsea:1Pj:0. I couldn’t be happier. . .  while on the other hand feeling slightly guilty. . . . Men were sad, pouting ensued, I even believe him and our dog Baxter talked trash about me and the baby ruining the Bachelor Pad for roughly 6 minutes and then finally, the paint went up and the boys shut up. . . . and it was a fucking fab deal! Paige even helped paint, all the while using her limited vocabulary to repeatedly say “Bye Blue”. . . I’m pretty sure it was her tiny way of rubbing salt in daddy’s already open wounds. Either that or she was simply stating facts. #ByeBlue #LoveHer.

So laugh all you want, but this was the only photo (above) I had taken BEFORE the room was finished. Not entirely paying attention, yet aware that I wanted to blog about our revamp, I kinda forgot to take the “Before” pictures. Trust me you aren’t missing out on anything, especially the blue walls. So unfortunately this isn’t a “Before & After”format like I had initially planned but rather a “Come See How Good My Room Looks – Ron Burgundy” format. As long as we are clear on that, may I present to you our new bedroom(!!!): 

IMG_2921

IMG_2924

IMG_2939

IMG_2947

IMG_2953

IMG_2926

IMG_2951

IMG_2949

IMG_2930

IMG_2945

IMG_2944

IMG_2935

IMG_2922

IMG_2941

IMG_2956

TaDa!! Ok so a little background: We painted the walls a neutral beige (not positive on the color- message me if you want it for sure, I can look), purchased the bed frame from Ikea last summer- The Malm Collection Bed Frame in Espresso and some random Ikea Shelves we turned into a giant unit that encased the bed.  It was a total D.I.Y., the board across the top is a floating shelf and the two towers on each end, well I have NO idea how we figured it would all work, but it did and we love it. Total it ran us under $400.00 for the furniture updates. The dresser at the foot of the room is just an old hand-me-down that was painted black before to match . . . it needs a fresh coat of paint. The round mirror above the bed was a $29.00 purchase from BigLots. I’m not sure if everyone has a BigLots around them. . . I’m seriously sorry if you don’t. I have loved that place since I was 16. We have one a mile away, needless to say, I get in trouble. #SorryNotSorry. The bed set, FREE. #ThankYouWeddingShower and the little mason jars, floral, lamps, wall art, random decor and metal letters ($1.00 each- probably my favorite purchase – stay off my side of the bed!) were all things I had either lying around or purchased from Michael’s (With Coupons Of Course) for a total of $37.00. Paint was probably somewhere around $45. Two gallons with primer included. . . we already had the rollers and all that from many prior projects. So all in all, this room was completely revamped – Just trust me on this one, it was damn ugly before- for just over $500. Super simple and nothing over the top.

I would still like to add some art on either side of the TV and maybe a window topper to match the bed set but for now, it’s pretty much complete. . . and all for a feasible amount of cash! I just love it. . . . not to mention, now that all the rooms are almost identical in color, resale value is at its highest!! #IfWeEverActuallyMove. Can’t wait to nap it up this weekend. New Sheets, New Me!

Have any of you recently remodeled a room? I would love to see how everything turned out!! I’m also in the process of updating my craft room- post to come later!! Happy Friday!

Cheers!

– C

Free Valentine Prints! *

So typically I’m not a huge fan of “V-day”. To be honest, all I’ve ever hoped for was an excuse to get my hands on some chocolate covered strawberries. . . . like seriously. As if I couldn’t eat them any other day of the year, V-day is an excuse to eat not only 3 or 4, but a dozen. All at once. #NoShame. Hell I don’t even care for the fancy ones, I’ll make them myself. Just buy me some Dolci Frutta and I’ll dip those babies myself. . . . damn, then I can eat a whole pint of berries! You think I’m lying? Ask my husband (or anyone that lived with me in college), shit’s not even normal.

Anyhow, in honor of the people that DO care about such a worthless Hallmark Holiday, I’ve decided to provide you all with some free prints for the special occasion. A “V-day” gift from me to you- I typically sell prints on my Etsy Page but in honor of such a stupid romantic holiday, I decided to “share the love” so feel free to print these little monsters out and decorate the shit out of your homes. #ThankMeLater.

FREE V-day Prints

All of these prints are placed on a chalkboard backdrop for that rustic, charming feel I know you’re all going for. . . Or at least I was, when I made them. If you hate them, I’m sorry. Unfortunately you’ll have to wait until “V-Day” 2015 for my next installment of love. But seriously, LIKE THEM!

Love - Chalk 8x10Click To Download:

https://app.box.com/s/s7r6n01fdrkdxzl2em6s

I Love You - Free V-day Print - 8x10

Click To Download:

https://app.box.com/s/4f5amo69bfjmtf7vz119

Love You Always - Chalk 8x10

Click To Download:

https://app.box.com/s/pq7qk4uibogxn4em1g2u

XO Chalk - 8x10

Click To Download:

https://app.box.com/s/vwtw6g7p7ko3s6cvgbb8

So there’s that. The most mushy little prints I could possibly think up for your printable pleasure. Please don’t say I never gave you anything. Happy Monday! XoXo. 

Cheers!

– C